Crystal Ladder Charm
Supplies Needed:
- 24 gauge wire (soft such as copper or sterling or fine silver)
- 18 gauge wire (soft such as copper or sterling or fine silver)
- Wire cutters
- Round nose pliers
- Flat nose pliers
- Jewelry hammer
- Stainless steel block or another hard surface for hardening and flattening your wire
- Ruler
- 3mm beads
- Metal file (not shown)
- Gather all your supplies prior to starting
- Cut 5 to 6” of your 18 gauge wire
- Fold your wire in half making your folded end pretty small but not flat against each other
- Curl the ends of your wire around and back through the folded end (Larks Head knot)
- Using your round nose pliers making your loop smaller by pulling the ends of your wire through the loop tighter
- Continue making the loop smaller
- Even smaller loop…note mangled wires…not to worry we will be flattening and straightening them
- Using the flat part of your hammer lightly pound the end wires to straighten them
- You may also use your flat nose pliers to straighten the wire even more
10. Cut a 12” length of 24 gauge wire. Start wrapping with one end of your small gauge wire around your wire form
11. Make about 4 to 5 wraps
12. Move the wraps up to the top of your wire piece, leave the tail as we will trim it later
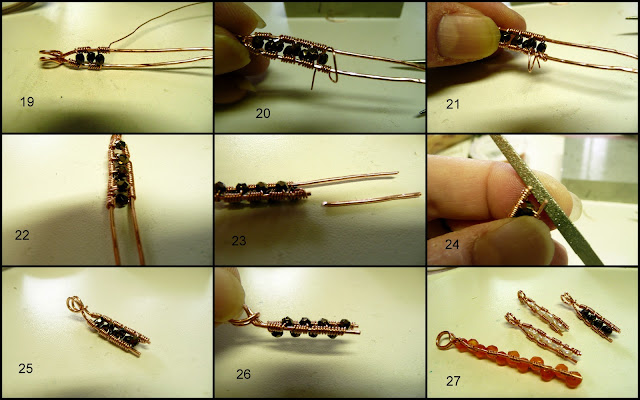
13. Add one bead on the longest end of your 24 gauge wire and center in the middle of your charm
14. Wrap the loose end of your wire around the opposite charm leg
15. Continue wrapping about 4 or 5 times
16. Turn your wire charm over and add another bead holding the heavier wire together against the bead
17. Wrap your wire on the opposite charm leg as you did previously
18. Trim the extra wire from the top of the charm and tuck the end in tight to the middle
19. Continue turning the charm over and adding beads until you have your desired length
20. To finish off on your last bead wrap, loop the end wire back through the middle of the charm and to the top of the last beads wraps
21. Wrap two or three times to secure22. One side of your wraps will be longer than the other side…this is okay
23. Trim close to your wraps on the longest side then match it with the other side
24. File your end wires so they are not sharp
25. All finished except for your jump ring
26. Side view reminds me of a ladder
27. These can be any length you choose. Try a longer one with 4 to 5mm beads for a pendant
I hope you enjoy this tutorial. These can be a little tedious to make but once you get your charm form completed adding the beads is a snap. You can also darken your copper by putting it in a solution of Liver of Sulfur and then using a polishing cloth or pad to take some of the dark off leaving it only in the crevasses.


Thanks for sharing this- very nice pendant and tutorial!
ReplyDeleteThanks for the tutorial. I love working with beads and wire, so I will have to give that a try!
ReplyDeleteGreat instructions--thanks Dana!
ReplyDeleteThanks for sharing this. I will have to find some time and give it a try. I love to try new things!
ReplyDeleteThanks for the tutorial. Love the blog, got linked from Elizabeth in NM and will be visiting often. You do some nice work. Go to my blog for some of my jewelry. www.blossomsbloomer.blogspot.com. I will be visiting your stores.
ReplyDeleteThanks for the tutorial, looks like even a beginner like me can handle it. I will give it a try.
ReplyDelete