Showing posts with label charm tutorial. Show all posts

Thursday, November 03, 2011

Falling Leaves Bracelet

I haven't written a tutorial in quite a while and thought it was about time. I just love these little leaf charms and wanted to make a bracelet so here it is.


Don't you just love the Fall colors. I made this one with Copper wire but you could use Gold, silver or bronze and it would be fantastic.

Supplies Needed:
· 20 Gauge copper wire (soft)
· Various crystals or Fall colored gemstones
· Head pins
· Open jump rings
· Premade Copper Chain Bracelet
· Round nose pliers
· Ruler
· Wire Cutters
· Chain nose pliers
· Jewelry Hammer
· Stainless Steel block or anvil
· Wine cork to use as template


1. Gather all your materials.
2. Cut several lengths of wire to 4 1/2” depending upon how many charms you want on your bracelet.
3. Wrap one wire around the cork or 3/4” dowel leaving one end shorter and twist tightly.
4. Remove the wire from the cork.
5. Cut the short end off.
6. Make a wrapped loop with the other wire.
7. Shape your loop into an oval.
8. Using your round nose pliers twist towards the center of the loop twice on each side to form the leaf.
9. Harden the leaf on the stainless steel block with your hammer.
10. Add beads/crystals/gemstones to headpins and make a wrapped loop.
11. Add 3 dangles beads with your leaf to an open jump ring.
12. Attach jump ring to bracelet.
13. Finished bracelet has a total of 9 leaf charms.

I wore this bracelet out tonight as we went to the Museum of Flight in Seattle and it was very comfortable and lightweight. Hopefully I'll have a few pictures to share with you of the museum tomorrow but until then enjoy the tutorial.

Friday, November 05, 2010

Tutorial - Crystal Ladder Charm or Pendant

Here is my tutorial for November. I made one of these in September while playing around and received several compliments that I decided to share the instructions with you. If you find any problems with the instructions or have questions, be sure to ask as I took the photos over a week ago and am just now getting to writing them down and I might have missed something. If you see in the instructions that I have indicated soft wire it was to make it easier on myself in making this charm. You could try aluminum wire as it is also easy to work with. I always use copper as my practice wire as it is so much cheaper than sterling.

Crystal Ladder Charm


Supplies Needed:
  • 24 gauge wire (soft such as copper or sterling or fine silver)
  • 18 gauge wire (soft such as copper or sterling or fine silver)
  • Wire cutters
  • Round nose pliers
  • Flat nose pliers
  • Jewelry hammer
  • Stainless steel block or another hard surface for hardening and flattening your wire
  • Ruler
  • 3mm beads
  • Metal file (not shown)

 Instructions:
  1. Gather all your supplies prior to starting
  2. Cut 5 to 6” of your 18 gauge wire
  3. Fold your wire in half making your folded end pretty small but not flat against each other
  4. Curl the ends of your wire around and back through the folded end (Larks Head knot)
  5. Using your round nose pliers making your loop smaller by pulling the ends of your wire through the loop tighter
  6. Continue making the loop smaller
  7. Even smaller loop…note mangled wires…not to worry we will be flattening and straightening them
  8. Using the flat part of your hammer lightly pound the end wires to straighten them
  9. You may also use your flat nose pliers to straighten the wire even more

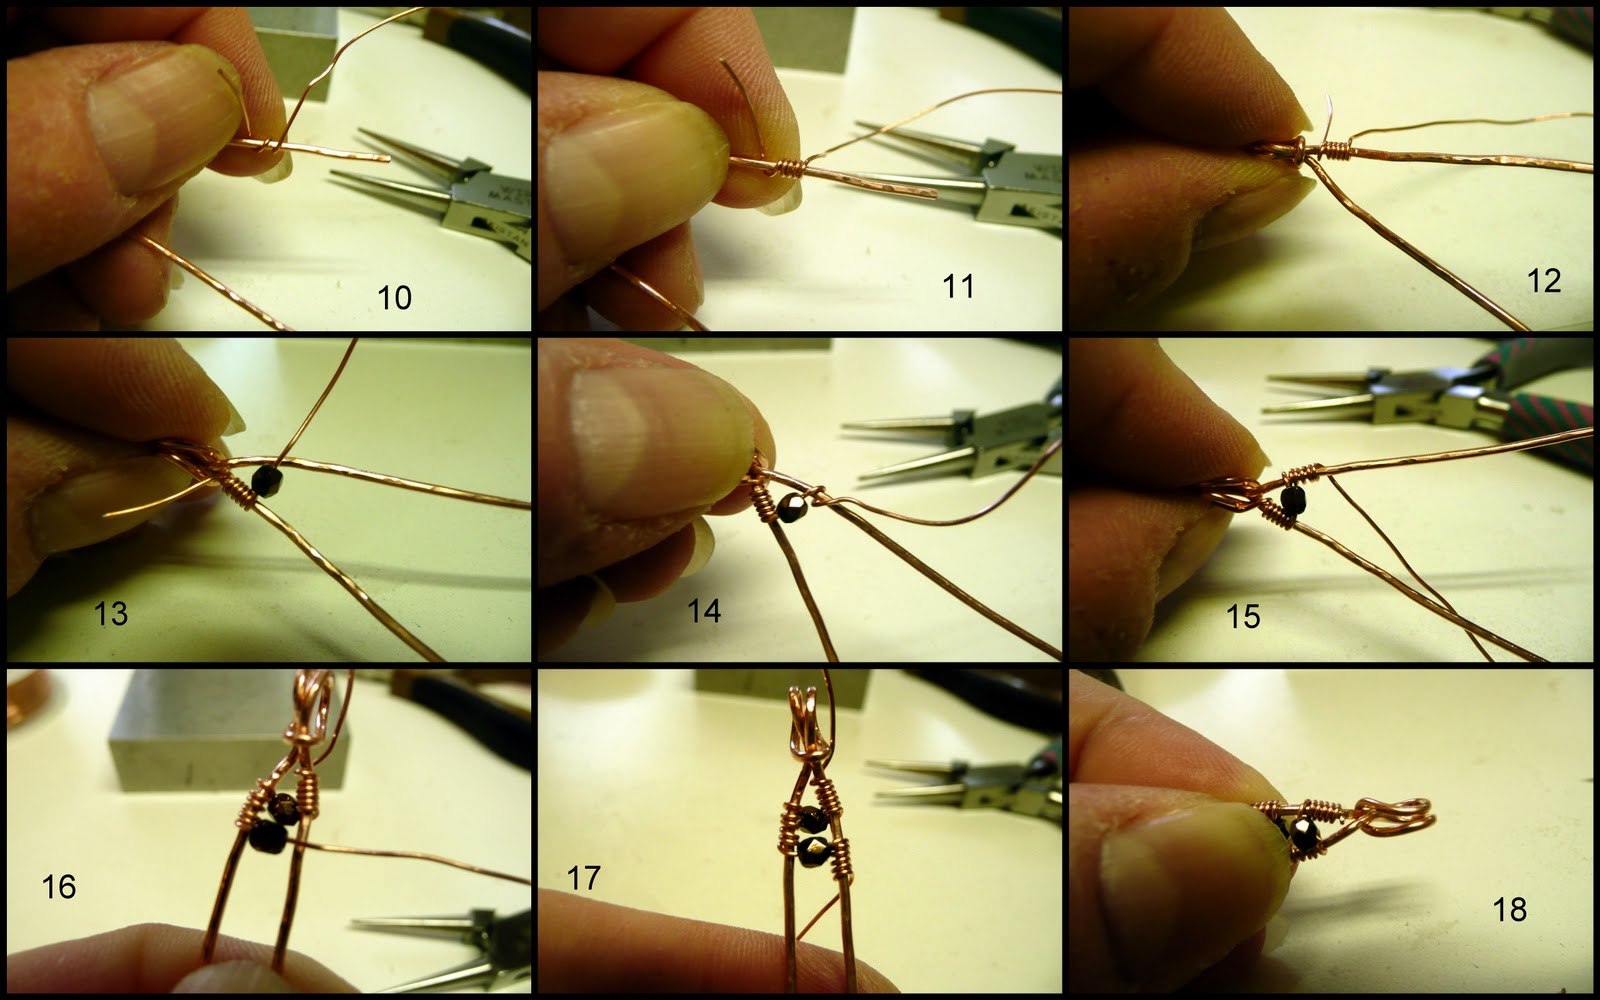
10. Cut a 12” length of 24 gauge wire. Start wrapping with one end of your small gauge wire around your wire form
11. Make about 4 to 5 wraps
12. Move the wraps up to the top of your wire piece, leave the tail as we will trim it later
13. Add one bead on the longest end of your 24 gauge wire and center in the middle of your charm
14. Wrap the loose end of your wire around the opposite charm leg
15. Continue wrapping about 4 or 5 times
16. Turn your wire charm over and add another bead holding the heavier wire together against the bead
17. Wrap your wire on the opposite charm leg as you did previously
18. Trim the extra wire from the top of the charm and tuck the end in tight to the middle


19. Continue turning the charm over and adding beads until you have your desired length
20. To finish off on your last bead wrap, loop the end wire back through the middle of the charm and to the top of the last beads wraps
21. Wrap two or three times to secure
22. One side of your wraps will be longer than the other side…this is okay
23. Trim close to your wraps on the longest side then match it with the other side
24. File your end wires so they are not sharp
25. All finished except for your jump ring
26. Side view reminds me of a ladder
27. These can be any length you choose. Try a longer one with 4 to 5mm beads for a pendant

I hope you enjoy this tutorial. These can be a little tedious to make but once you get your charm form completed adding the beads is a snap. You can also darken your copper by putting it in a solution of Liver of Sulfur and then using a polishing cloth or pad to take some of the dark off leaving it only in the crevasses.

LinkWithin

Blog Widget by LinkWithin