Showing posts with label how to. Show all posts

Saturday, February 11, 2012

Delightful Bangles, a tutorial


I was inspired today to make a bracelet, so I made 3... ha ha. My fingers do hurt now but I did take pictures and write up a quick little tutorial if you want to give it a try. I got the inspiration from a Pin on Pinterest of this Bangle but it didn't have enough pictures for me so decided to make one for myself and do lots of pictures for you. This one is easy if you have all the supplies and you do not need any soldering equipment. So let's get started.

Supplies Needed:

  • Round nose pliers
  • Flat nose pliers
  • Flush wire cutters
  • Bracelet Mandrel
  • Hammer
  • Stainless Steel Block
  • 12 or 14 gauge wire (for bracelet)
  • 24 or 26 gauge wire (for wrapping)
  • 3mm stones or crystals


Instructions:

  1. Gather all your supplies before you start and make sure the stones you choose will slide on the wrapping wire.
  2. Cut 10” of your bracelet wire which is either 12 gauge or 14 gauge.
  3. Make a loose curl on one end of the cut wire with your round nose pliers.
  4. Form your wire around the bracelet mandrel inserting the straight end through the curled end. As you can see I have marked on my mandrel the size I want my bracelet to be. Mine is 8”.
  5. With your round nose pliers curve the straight end of the wire around to tighten.
  6. Make a loop with the curved wire.
  7. Hammer the wire on the bracelet mandrel all the way around… hammer more.
  8. Hammer on the stainless steel block. Switch between the mandrel and the block, hammering to harden the wire.
  9. When it is the shape you want, nice and round and lays flat you are ready to begin to add your stones.


  1. Cut about 36” of your wrapping wire which is either 24 gauge or 26 gauge and start wrapping on your bracelet at the coiled end.
  2. Wrap the tail of the wire until you just have about 1/4 “ left.
  3. String a stone on the long end of the wire.
  4. Bring the stone down tight against the bracelet.
  5. Hold the stone in place and start wrapping the wire around the bracelet.
  6. Continue wrapping about 3 or 4 times, add another stone.
  7. More wrapping.
  8. Continue wrapping and adding stones until you get to the end of your wire.
  9. Cut the wire at the top of the bracelet and flatten with your flat nose pliers.
  10. Cut another length of wrapping wire (not as much) and start wrapping around the bracelet. I like to start wrapping behind the stone and then wrap around to the front. I cut the tail off on top of the bracelet and flatten it with my pliers.
  11. Continue wrapping and adding stones until you get back to the beginning. Clip tails and flatten them on top of the bracelet. Always cut the wire on the top or sides otherwise it will scratch your wrist underneath.
  12. Enjoy your bracelet.
If you have any questions, please be sure to ask.

Thursday, November 03, 2011

Falling Leaves Bracelet

I haven't written a tutorial in quite a while and thought it was about time. I just love these little leaf charms and wanted to make a bracelet so here it is.


Don't you just love the Fall colors. I made this one with Copper wire but you could use Gold, silver or bronze and it would be fantastic.

Supplies Needed:
· 20 Gauge copper wire (soft)
· Various crystals or Fall colored gemstones
· Head pins
· Open jump rings
· Premade Copper Chain Bracelet
· Round nose pliers
· Ruler
· Wire Cutters
· Chain nose pliers
· Jewelry Hammer
· Stainless Steel block or anvil
· Wine cork to use as template


1. Gather all your materials.
2. Cut several lengths of wire to 4 1/2” depending upon how many charms you want on your bracelet.
3. Wrap one wire around the cork or 3/4” dowel leaving one end shorter and twist tightly.
4. Remove the wire from the cork.
5. Cut the short end off.
6. Make a wrapped loop with the other wire.
7. Shape your loop into an oval.
8. Using your round nose pliers twist towards the center of the loop twice on each side to form the leaf.
9. Harden the leaf on the stainless steel block with your hammer.
10. Add beads/crystals/gemstones to headpins and make a wrapped loop.
11. Add 3 dangles beads with your leaf to an open jump ring.
12. Attach jump ring to bracelet.
13. Finished bracelet has a total of 9 leaf charms.

I wore this bracelet out tonight as we went to the Museum of Flight in Seattle and it was very comfortable and lightweight. Hopefully I'll have a few pictures to share with you of the museum tomorrow but until then enjoy the tutorial.

Friday, November 05, 2010

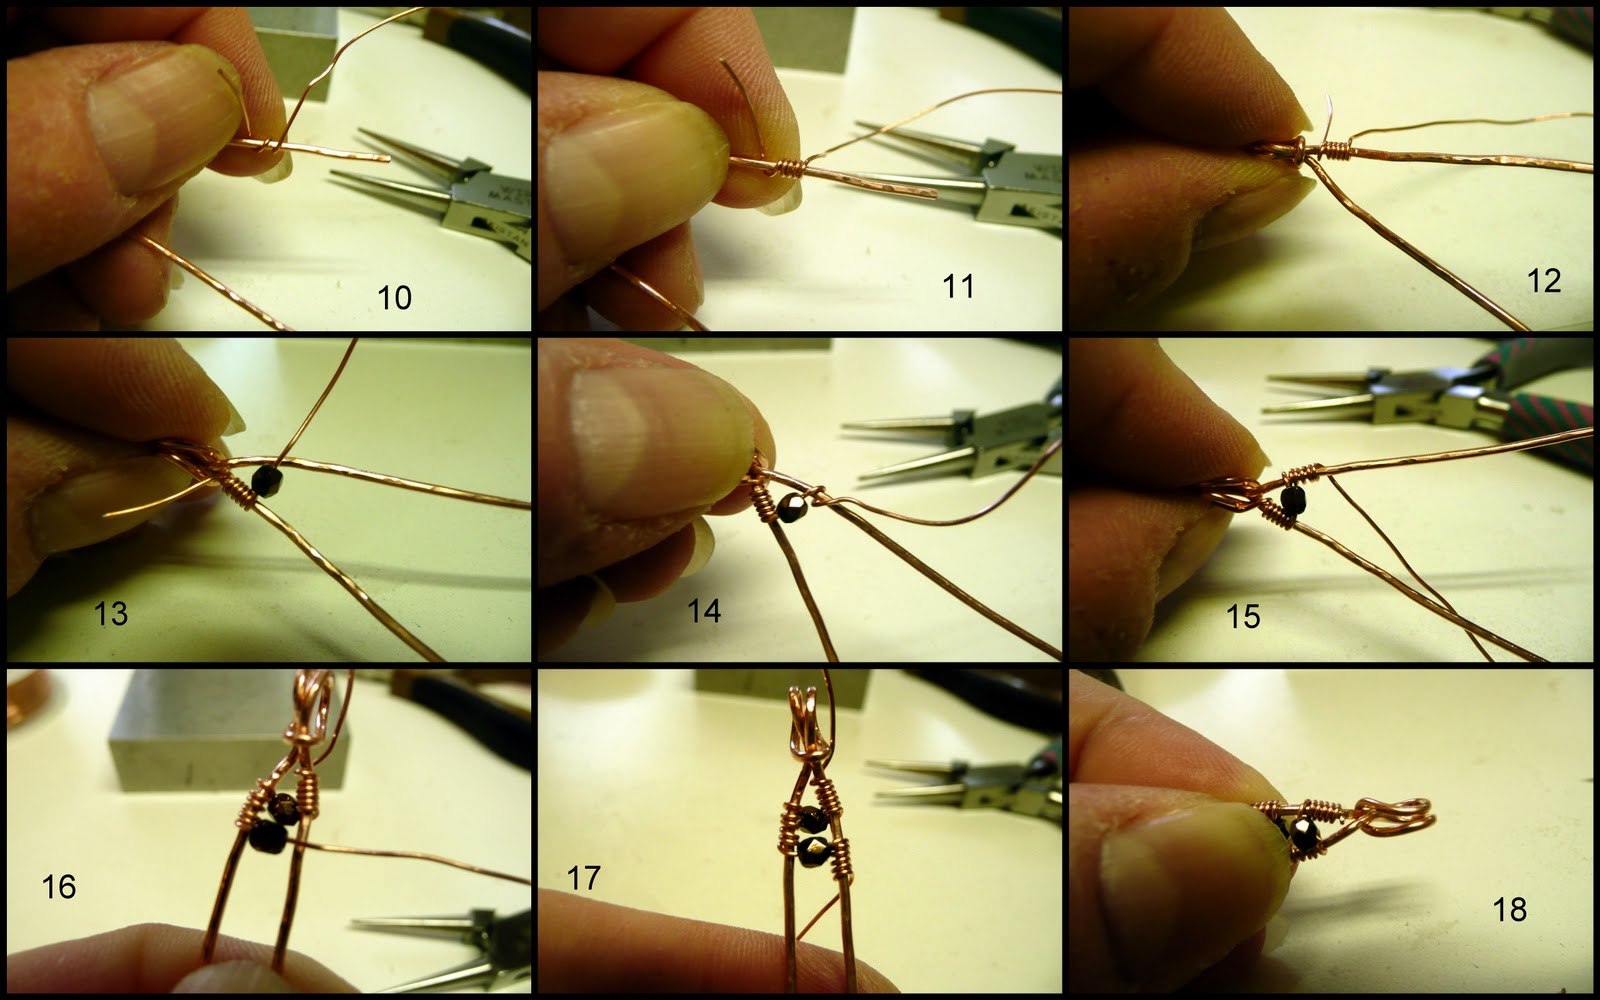
Tutorial - Crystal Ladder Charm or Pendant

Here is my tutorial for November. I made one of these in September while playing around and received several compliments that I decided to share the instructions with you. If you find any problems with the instructions or have questions, be sure to ask as I took the photos over a week ago and am just now getting to writing them down and I might have missed something. If you see in the instructions that I have indicated soft wire it was to make it easier on myself in making this charm. You could try aluminum wire as it is also easy to work with. I always use copper as my practice wire as it is so much cheaper than sterling.

Crystal Ladder Charm


Supplies Needed:
  • 24 gauge wire (soft such as copper or sterling or fine silver)
  • 18 gauge wire (soft such as copper or sterling or fine silver)
  • Wire cutters
  • Round nose pliers
  • Flat nose pliers
  • Jewelry hammer
  • Stainless steel block or another hard surface for hardening and flattening your wire
  • Ruler
  • 3mm beads
  • Metal file (not shown)

 Instructions:
  1. Gather all your supplies prior to starting
  2. Cut 5 to 6” of your 18 gauge wire
  3. Fold your wire in half making your folded end pretty small but not flat against each other
  4. Curl the ends of your wire around and back through the folded end (Larks Head knot)
  5. Using your round nose pliers making your loop smaller by pulling the ends of your wire through the loop tighter
  6. Continue making the loop smaller
  7. Even smaller loop…note mangled wires…not to worry we will be flattening and straightening them
  8. Using the flat part of your hammer lightly pound the end wires to straighten them
  9. You may also use your flat nose pliers to straighten the wire even more

10. Cut a 12” length of 24 gauge wire. Start wrapping with one end of your small gauge wire around your wire form
11. Make about 4 to 5 wraps
12. Move the wraps up to the top of your wire piece, leave the tail as we will trim it later
13. Add one bead on the longest end of your 24 gauge wire and center in the middle of your charm
14. Wrap the loose end of your wire around the opposite charm leg
15. Continue wrapping about 4 or 5 times
16. Turn your wire charm over and add another bead holding the heavier wire together against the bead
17. Wrap your wire on the opposite charm leg as you did previously
18. Trim the extra wire from the top of the charm and tuck the end in tight to the middle


19. Continue turning the charm over and adding beads until you have your desired length
20. To finish off on your last bead wrap, loop the end wire back through the middle of the charm and to the top of the last beads wraps
21. Wrap two or three times to secure
22. One side of your wraps will be longer than the other side…this is okay
23. Trim close to your wraps on the longest side then match it with the other side
24. File your end wires so they are not sharp
25. All finished except for your jump ring
26. Side view reminds me of a ladder
27. These can be any length you choose. Try a longer one with 4 to 5mm beads for a pendant

I hope you enjoy this tutorial. These can be a little tedious to make but once you get your charm form completed adding the beads is a snap. You can also darken your copper by putting it in a solution of Liver of Sulfur and then using a polishing cloth or pad to take some of the dark off leaving it only in the crevasses.

Monday, July 27, 2009

Crochet Bracelet

Futuregirl.com has this great little tutorial for creating this crochet bracelet with beads. I love to crochet and most of you know I love jewelry, so I might have to give this a try. I can see this made with vintage beads and a vintage button. Check out Futuregirl.com blog HERE and give it a try.

Supplies Needed

Crochet Cotton Thread
48 beads
1 button
big-holed needle
size C (2 or 2.75mm) crochet hook

Monday, July 20, 2009

Wig Jig Bracelet Design


Have you ever used a wig jig? I have one but don't use it very often, but may have to try this bracelet design. Looks simple and would be great using sterling silver or copper wire with gemstones as shown.
The instructions for this pattern are found on www.wigjig.com on this page HERE.
Enjoy!

Wednesday, July 08, 2009

Wicked Wednesday - Cocktail Time

Gourmet.com is publishing the recipes for cocktails from the 1940's-2009. They are up to the 1960's and I have chosen those drinks that I have at least tasted. There are some interesting combinations that I never would have thought of and some that I would really like to try like the Mary Pickford from the 1940's. You choose your favorites and have some fun this Summer and be careful of that Zombie from the 1950's.

Of the three drinks pictured the Whiskey Sour is from the 1940's, Grasshopper from the 1950's (not my favorite drink) and the Sangria from the 1960's (sounds good now).


Monday, July 06, 2009

How to Make - Leather Chain Necklace


This is a great idea for not only leather, but imitation leather or nice felt....where ever your imagination takes you. I for one love the look of the white leather and can see this as a bracelet also. All you need to make the necklace is leather and scrap will do, an x-acto knife, cutting mat, scissors, needle and thread..oh and the template of course.

Tutorial is curtsey of Britt McMaster over at Cumbersome. Check out her web site for complete instructions and the template. Enjoy.

Monday, June 29, 2009

Make a Hemp Knotted Necklace


I haven't tried to do macrame in such a long time. I remember when my mother used to make the hanging planter holders and all that was popular in the 70's. This style of choker or bracelet has been popular again for quite awhile again with the younger generation, yes, teens, twenty something, so I thought I would post this link here for all to enjoy and remember the old days..ha. and maybe make one for their grand-daughter, daughter or even themself.

Here is the link to Azerael's Squidoo Lens. http://www.squidoo.com/Hemp-Choker

If you make one of these, send me a picture and I'll post it for all to enjoy. I may have to go on the lookout for a simple tutorial design that can be made for men/boys.

Look for new songs tomorrow on my post (yes, I have watched Sleepless in Seattle again) and an update on Wednesday with a new recipe and status on how the diet is going. I did make a few new jewelry items this past week and weekend, but unfortunately was busy Saturday and Sunday and didn't get anything posted, so don't be surprised if you find an extra post here and there this week so I can get it all out of my system.

If you really like how to's, be sure to check out my crafty news blog where I feature lots of tutorials on everything from paper crafts to crochet. http://crafthowtos.blogspot.com.

Until then, have a great Monday!

Monday, June 22, 2009

Make a Necklace Display

I found this great idea to make your own necklace display. This was timely as I was in the process of looking at replacing the ones I use for shows and this gives me the option to choose what material background to use. Instructions were found on Rena Klingenberg's web site:
http://www.home-jewelry-business-success-tips.com/necklace-display.html and were written by Bea Graansma. Here you go.

Make a Necklace Display
a cheap and easy way to create a great looking necklace bust
© by Bea Graansma; all rights reserved
I made this necklace display that can be used for showing your work at jewelry shows and parties. It's also a great prop for photographing your jewelry. This necklace bust is very inexpensive, and takes less than an hour to make:

Trace the pattern shown in Figure 2 onto a piece of cardboard and cut it out. The pattern here is 25 cm high x 28 cm wide, but feel free to make your necklace bust taller or shorter than shown here. Figure 2: Pattern for necklace display.The small square drawn near the middle of the patternrepresents 1 square centimeter.

Glue fabric to the front of your display. Imitation leather, velour, or satin can make your display look really elegant. If you choose imitation leather, you have to use a very strong glue, otherwise it doesn't hold at the folds. In Figure 3, you can see the bare cardboard on the back of mine.
Punch a hole in each of the two the bottom corners, as indicated on the pattern.
Run a knitting needle or the back of your scissors over the lines at the top and each side of your necklace display, so they will be easy to fold. (See the lines in Figure 2.)
Carefully fold back the sides and top along these fold lines.
Thread a piece of string or elastic through the two holes and tie the string ends together, as shown in Figure 3, to hold the sides back and make your necklace display stand upright.
Adorn your fabulous new necklace bust with a piece of jewelry!

I'm not sure this display would be sturdy enough for frequent use at shows and fairs; I originally intended it to be used for photographing necklaces. But it's cheap, and therefore easy to replace when it shows wear and tear.

Have fun with your great new necklace display!

Bea has a tutorial available with updated and more detailed instructions and a printable pattern if you would like to purchase, here is the link to that tutorial on her ETSY shop. http://www.etsy.com/view_listing.php?listing_id=21379676.

Monday, June 15, 2009

Crafty Monday - Glass Tile Tutorial

I've been wanting to make some of these glass tile pendants for awhile and have several great images to use, so I ordered some glass and found this tutorial that I would share. When I get mine completed, I'll share those with you....maybe on Saturday.


I had found another tutorial to making these pendants only using scrabble tiles and here is the link to that blog if you would like the reference. http://crafthowtos.blogspot.com/2009/05/how-to-make-scrabble-tile-pendantcharm.html

Monday, June 08, 2009

Crafty Monday - Gold Link Necklace


For our crafty Monday I thought I would find a jewelry tutorial. I will probably keep to that theme from now on since I have the other Crafty News blog where all the other tutorials will be. This necklace and instructions can be found on the Fire Mountain Gems site along with a slew of other projects. They have great ideas and all the materials can be purchased from them....go figure.

I thought this gold necklace with the simple drops was perfect for almost any outfit. You could even change it up by using gemstones vs. glass beads. I love it and may have to put my order in for some of those fancy links so that I can make a necklace for myself.
Enjoy!

Monday, May 25, 2009

Crafty Monday - Ankle Bracelets


Found this great tutorial on making ankle bracelets and since warmer weather is hopefully upon us, now would be a good time to make a few for yourself or friends. They appear to be relatively inexpensive to make with all the supplies available at either Michaels or JoAnn Fabrics. So, head on over to All Things Heart and Home and give them a try.
Have a great Monday.


Monday, May 18, 2009

Crafty Monday - Tissue Box Cover

For our craft day I found this tutorial for a reversible tissue-box cover. A bit of a reminder from the 70's when these were really popular...hummmm, but I bet we could make it better with some of the great fabrics we have available today.


Thursday, January 24, 2008

At a Stand Still

What do you do when you have so many ideas for things that you can't seem to get to them all? I think this is where I am at now.

I entered a jury competition for RAGS this year and was turned down because my jewelry looked the same as everyone elses. Hmm, I guess when you think about it everyone's jewelry that is being designed today looks like everyone elses. I'm not put off by this, but will definately look at what I'm designing and what is selling. During the holidays, I sold a lot of wire wrapped pendants and gemstone wire trees. I tried selling them about 3 years ago and no one wanted them, go figure that I'm a few years ahead of everyone else. In doing some research on the web, I found that there really isn't a lot of tutorials about how to wire wrap a pendant. There are some simple designs, and that seems to be what everyone is making. I may have to give this some thought, but I could put a couple of designs out here for reference that I have developed. Since I have so much going on right now, this will have to be a goal for later in the year.

If you have read my blog on gem trees, you will now know that I am writing a book on how to make a gem tree. This is taking up a huge amount of my at home time reserved for relaxing. If I'm not writing then I'm making a tree or trying out a new design or material. I found some freshwater pearls at a local large bead shop that are flat and leaf like that I'm working with now. It should prove to be a wonderful looking little tree and one that I hope I have picture for the book as another option to gemstones.

On another note, anyone that knows me knows that I have jewelry on consignment at a salon. In 2006, the Salon did about a 1/3 of my overall jewelry sales and again in 2007 they did about 1/3. I did revamp the jewelry available at the salon this year to items under $50.00. Earrings are always $10.00, bracelets run up to $35.00 and necklaces to $50.00. This does create a challange for me as I have to find affordable gemstones that are still good quality. International Gem and Jewelry shows are my favorite place to look for affordable stones. Unfortunately to get them cheap, you have to buy in bulk. I may have to take a couple of friends along this year and share the wealth so that I don't end up with 6 or more strands of the same type and style of stone.

Well, I'll keep plugging along, but if you find you are stuck or have too much to do, be aware you are not alone.

Thanks for reading, Dana

LinkWithin

Blog Widget by LinkWithin