Showing posts with label craft tutorials. Show all posts

Friday, November 05, 2010

Tutorial - Crystal Ladder Charm or Pendant

Here is my tutorial for November. I made one of these in September while playing around and received several compliments that I decided to share the instructions with you. If you find any problems with the instructions or have questions, be sure to ask as I took the photos over a week ago and am just now getting to writing them down and I might have missed something. If you see in the instructions that I have indicated soft wire it was to make it easier on myself in making this charm. You could try aluminum wire as it is also easy to work with. I always use copper as my practice wire as it is so much cheaper than sterling.

Crystal Ladder Charm


Supplies Needed:
  • 24 gauge wire (soft such as copper or sterling or fine silver)
  • 18 gauge wire (soft such as copper or sterling or fine silver)
  • Wire cutters
  • Round nose pliers
  • Flat nose pliers
  • Jewelry hammer
  • Stainless steel block or another hard surface for hardening and flattening your wire
  • Ruler
  • 3mm beads
  • Metal file (not shown)

 Instructions:
  1. Gather all your supplies prior to starting
  2. Cut 5 to 6” of your 18 gauge wire
  3. Fold your wire in half making your folded end pretty small but not flat against each other
  4. Curl the ends of your wire around and back through the folded end (Larks Head knot)
  5. Using your round nose pliers making your loop smaller by pulling the ends of your wire through the loop tighter
  6. Continue making the loop smaller
  7. Even smaller loop…note mangled wires…not to worry we will be flattening and straightening them
  8. Using the flat part of your hammer lightly pound the end wires to straighten them
  9. You may also use your flat nose pliers to straighten the wire even more

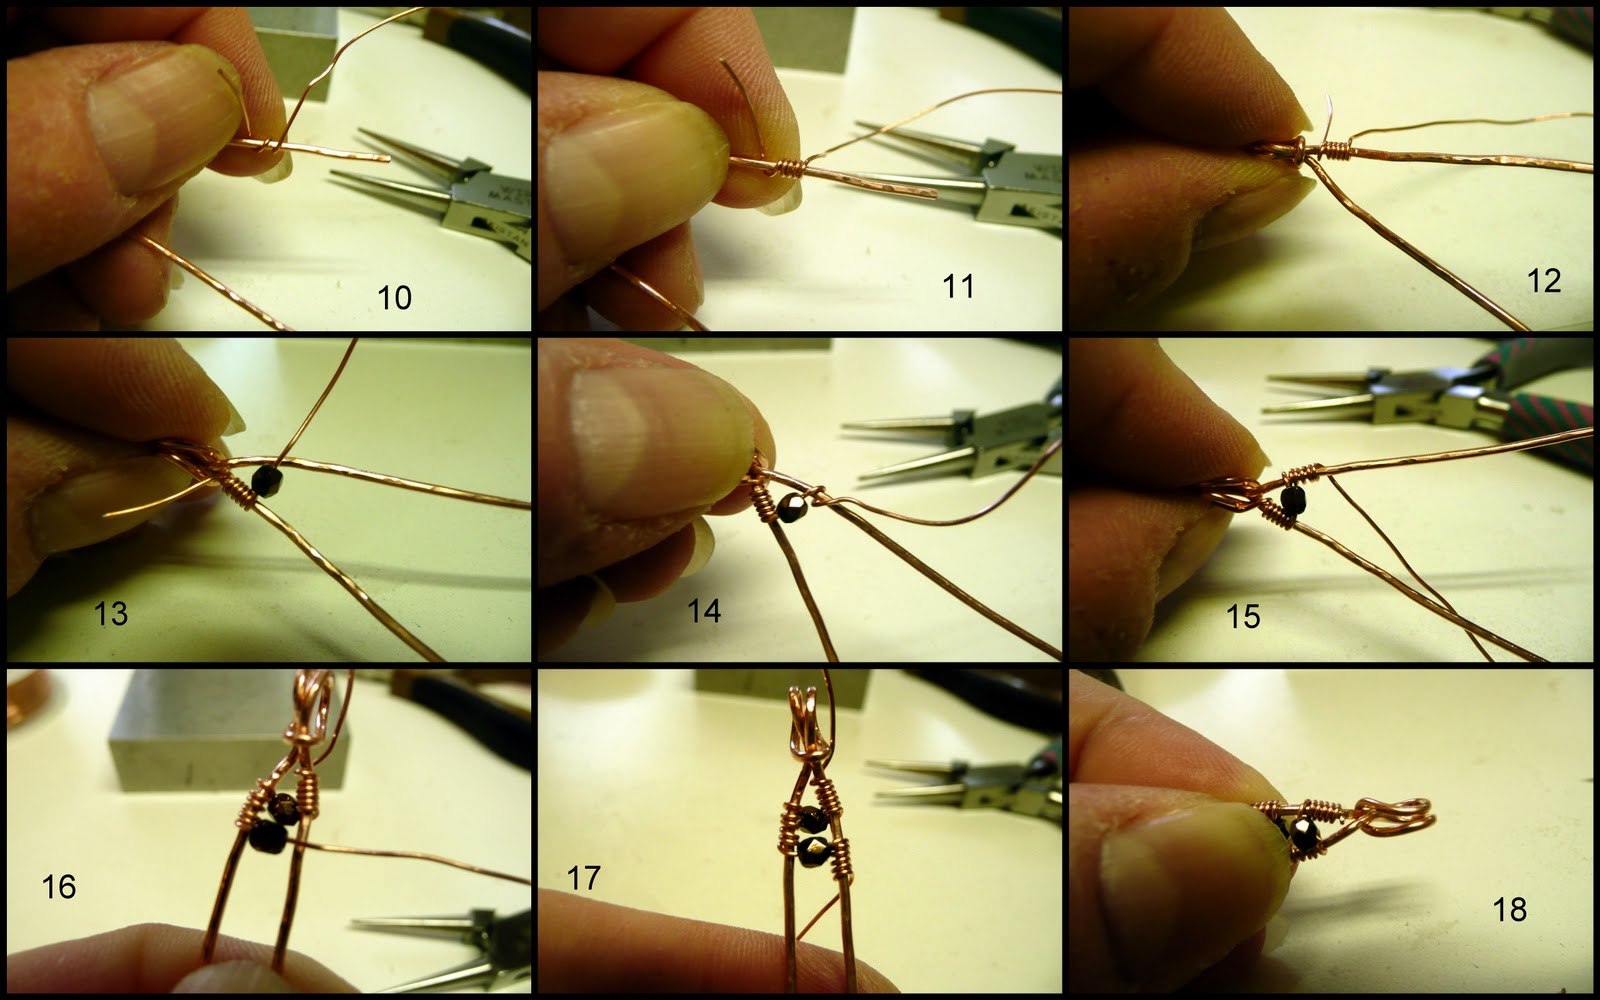
10. Cut a 12” length of 24 gauge wire. Start wrapping with one end of your small gauge wire around your wire form
11. Make about 4 to 5 wraps
12. Move the wraps up to the top of your wire piece, leave the tail as we will trim it later
13. Add one bead on the longest end of your 24 gauge wire and center in the middle of your charm
14. Wrap the loose end of your wire around the opposite charm leg
15. Continue wrapping about 4 or 5 times
16. Turn your wire charm over and add another bead holding the heavier wire together against the bead
17. Wrap your wire on the opposite charm leg as you did previously
18. Trim the extra wire from the top of the charm and tuck the end in tight to the middle


19. Continue turning the charm over and adding beads until you have your desired length
20. To finish off on your last bead wrap, loop the end wire back through the middle of the charm and to the top of the last beads wraps
21. Wrap two or three times to secure
22. One side of your wraps will be longer than the other side…this is okay
23. Trim close to your wraps on the longest side then match it with the other side
24. File your end wires so they are not sharp
25. All finished except for your jump ring
26. Side view reminds me of a ladder
27. These can be any length you choose. Try a longer one with 4 to 5mm beads for a pendant

I hope you enjoy this tutorial. These can be a little tedious to make but once you get your charm form completed adding the beads is a snap. You can also darken your copper by putting it in a solution of Liver of Sulfur and then using a polishing cloth or pad to take some of the dark off leaving it only in the crevasses.

Saturday, September 04, 2010

A Featured Tutorial - Wrap Bracelet by Ruby Mines

Remember this bracelet that I made back in August that was one of my Look for Less postings? Here is the link if you want to refresh your memory. http://danasjewelrydesign.blogspot.com/2010/08/look-for-less-or-is-it-more.html. Well I found a tutorial to make this exact bracelet based upon the original one by Chan Luu.

My version $10.00

Chan Luu for $295.00

Ruby Mines $15.00


Check out Robin's tutorial to make her version of this wonderful leather and bead wrap bracelet.

Having a great weekend, how about you?


Thursday, May 27, 2010

May Sewing Tutorial - Kleenex Holder

Everybody and I mean everybody needs one of these...okay maybe not the men in our lives (I bet you could make one for a man to keep at his desk or in his car...just choose manly fabric) but all women need to have one of these in their purse, totebag or backpack. Do you know how nasty it is to pull a kleenex out of your purse and you don't know if you've used it or not because it is all scrunched up. Yuk. Make these for all your friends and family members for presents. They will appreciate it. Way too easy not to make, but it is easier if you have a sewing machine.

So, what do you need besides the travel kleenex packs? Material any old kind will work. You can even use up scrap fabric or old cotton shirts, jeans, etc. that you want to recycle. Since this is my first time at a sewing tutorial, bare with me and please ask questions if something isn't clear.


Instructions:
  1. Cut two pieces of fabric 7" x 6", these can be the same fabric or two different coordinating fabrics.
  2. I choose to use some scrap fabric I had left and the floral will be the outside with polka dots on the inside.
  3. Line up your pieces right sides together as shown.
  4. Sew the short (6") side on both ends together. I used about a 3/8" sem allowance.
  5. Both short sides have been sewn.
  6. Turn fabric to the right side, press or finger press the seams flat. 
  7. I always make sure my kleenex pack will fit. Your now finished seams will be at the center of the pack. Be sure to have your lining or inside fabric on the outside now. Remember mine was polka dots.
  8. Fold the sides to the middle. I overlapped the center by just a bit as I had a little extra when measuring in step 7. Basically you are making an envelope to insert your kleenex into.
  9. Sew the side seams reinforcing the middle where most of the stress will be from opening and closing the pack.
  10. I went ahead and zig zagged the edges but you don't have to. Be sure to trim off all your loose threads.
  11. Turn your holder right side out as the polka dot was my inside fabric.
  12. Finished holder
  13. Insert your kleenex into your new holder.
  14. Nice seam in the front. You could have top stitched the front seam before going onto step 7 if you wanted a more finished look.
  15. Finished holders. Note the creamy one with the colored swirls and flowers on the right side was not overlapped in the middle prior to sewing the side seams. Still looks good.
I know this looks like a lot of steps, but these can be whipped up in a matter of minutes. I know that we were going to visit a family member and I wanted to take a little something for her and just 10 minutes before leaving I decided to make her one of these. Quick as a jiffy it was done.

I'm sure there are lots of patterns out there for kleenex holders, but this is my take. I do have these for sale in my shop but feel free to make as many of these as you like and if you don't want to make one....come visit my ArtFire studio and I'll make one special for you.

Wednesday, May 26, 2010

May Tutorial - Leather Loop Earrings

Well if you receive my newsletter you will know that I promised to get my May tutorials out on my blog this week. If you haven't read it and want to... here it is. http://us1.campaign-archive.com/?u=c6029baa40fd1321f00155764&id=cede576a91

Leather Loop Earrings

On to the tutorial. Here is what we will be making today. I've shown my gold leather necklace and earrings in another post and the tutorial for the making the leather necklaces were published in an April post HERE, so I needed a pair of earrings to go with my silver. These are so easy and lightweight to wear. You don't even feel like you are wearing long earrings, although by making them yourself you can adjust the length. These are inspired by a pair of earrings out of the Sundance Catalog HERE.


Supplies you will need:

  • Earring findings (I used sterling silver lever backs)
  • 1mm or .5mm leather cord
  • silver crimp tubes with the loop
  • misc. beads to dangle or if they have a large enough hole, slip onto the leather
  • head pins if needed
  • crimp pliers
  • round nose pliers
  • wire cutters
  • needle nose pliers


Instructions:

  1. Gather supplies as noted above
  2. Measure two equal lengths of leather (mine were a little over 3")
  3. Make wrapped loops on all the beads you want to dangle off the bottom of the leather loop using the head pins (Artbeads has a great tutorial)
  4. Be sure to tuck in the wire tail after cutting your wire (see I need to do that to this one)
  5. String all your beads on the leather to create your design
  6. Make sure your cord or leather will fit inside the crimp tube
  7. Insert one end of the cord into the crimp
  8. Crimp the tube over the leather (be sure to not crimp too close to the loop as the loop will fall off....yes I learned this the hard way)
  9. Crimp the other end of your leather with your beads in the center
  10. Add your earring finding by opening the loop at the bottom and inserting the crimp loops. Never pull a jump ring or finding directly apart from each other, always twist apart gently until you have just enough room to insert your loops.
That's it, make your other earring to match or not....some of you may get really creative and I would love to see what you have done with these. 

Here is a picture of my completed gold and leather set, which by the way I am wearing today.


Tuesday, April 27, 2010

April Tutorial - Leather Necklaces

I didn't know what to call these necklaces, but they are both leather and one has knots. These are great for casual wear with jeans or dress them up a bit.

Necklace #1
Supplies you need for both necklaces:
Leather 1mm (necklace #1 = 38" and #2 = 54")
Beads with a hole large enough for the leather
Other beads to dangle (necklace #2)
Head pins (necklace #2)
Spring ring or Lobster claw clasp
4 - 4" strips of 22 gauge silver wire for both necklaces (I used sterling, but you could use whatever you have on hand)

Instructions for Necklace #1:
  1. Gather your supplies (leather, clasp, wire and beads)
  2. String your beads on the leather
  3. Loop leather, add your clasp and wrap with the wire on one end
  4. Finished clasp end
  5. Loop leather and wrap with the wire the other end
  6. Finished clasp
Necklace #2

Instructions for Necklace #2:


  1. Knot the center of your longest piece of leather (54") and add one bead on each side
  2. Made a wrapped loop crystal
  3. Add crystal to necklace and knot the leather (Continue adding large hole beads or beads that dangle and knotting the leather between each)
  4. When you have the length you desire (mine was 36") finish one side with the clasp as we did in Necklace #1
  5. Finish the other side with just a loop
  6. Finished necklace with dangles and beads
Here are the two necklaces finished.


Here are both of the necklaces doubled up to wear short. I did this with one of mine made the same way with silver and agate beads and received lots of compliments.


Have fun, use different colored leather, lampwork beads, crystals, pearls for whatever outfit you want to match. I wanted a couple that would go with anything so I just used the silver, clear crystal and a small black lampwork bead.


Thursday, October 22, 2009

New Social Networking Site for Crafters

As if I didn't have enough to do, I started a new social networking site for crafters. The point is to share ideas, tutorials and network with other crafters. I even added a marketplace so that E-bay, Etsy, Amazon and Yahoo sellers can show and sell their work for free. The marketplace just links to their existing site. No rules except that you can not post any porn or offense material. I welcome others who would like to join me.

Here is the link:  http://crafthowtos.ning.com/

As a bonus, I will be posting tutorials on the craft site vs. here, but never fear, I will link to them so you can still enjoy without having to check out two places, but if you are only interested in tutorials and instructions, that would be the place to check first.

The first tutorial I posted is for the Leather Fringe necklace that I posted here in August that was so popular. As I develop more tutorials and get permission for reprinting some from other authors, they will be posted.

LinkWithin

Blog Widget by LinkWithin