Showing posts with label recipe. Show all posts

Sunday, March 03, 2013

Sunday Breakfast Casserole

Well, this morning I woke up and decided to actually cook breakfast and not just have a bowl of cereal. Since it was after 9 am...yes I did sleep in, it would have to be a late breakfast and since I'm a bit lazy in the morning decided to go for the good old breakfast casserole. Now if you haven't made a breakfast casserole before there are tons of recipes out on the internet but I have devised one that works for me since it is just hubby and I and didn't want a large pan of leftovers.


This recipe will feed 6 so it is very economical.

You will need a 9 x 9 or similar size pan. I used my Fiestaware one. 

1/2 Green Bell Pepper diced
1/2 Medium Onion diced
1/2 lb ground sausage cooked and crumbed (I used 2 sausage patties since that is what I had)
1 1/2 cup grated cheese (I used a 4 cheese blend)
6 eggs
1 1/2 cups milk
3 slices of bread
salt and pepper

Preheat oven to 350 degrees and spray your pan with a spray oil such as Pam.

Saute your diced green pepper and onion until just tender. My sausage patties were the pre-cooked kind but I heated them up as they were frozen and then diced them. Set these aside.

In a mixing bowl whip eggs, add salt and pepper then the milk. Whip all together with fork or wire whisk.

Rip your bread slices into pieces and put an even layer on the bottom of your sprayed or oiled pan. Layer your sausage, cooked onion and pepper and 1 cup of the cheese over the bread. Pour the egg/milk mixture over the top and sprinkle the remaining 1/2 cup of cheese.

Bake for 25 - 30 minutes. The edges will be slightly brown and the middle will not wiggle. You could also do the knife trick and stick it in the middle and if it comes out clean it is done.

This is also good to make up the night before, cover it and have in the refrigerator ready to pop in the oven when you get up.

This was perfect for a Sunday brunch. I added a couple slices of bacon and you could add some fruit. How else could you feed 6 people breakfast on 6 eggs, 2 slices of sausage and 3 pieces of bread? Now you can.

If you don't like peppers and onions...leave them out or add in some different cooked veggies such as zucchini, mushrooms, a few sun dried tomatoes chopped up (yum), smoked salmon instead of the sausage, frozen hash browns instead of the bread.....so many options.

Now I'm ready to tackle the day. Oh, that's right it's Sunday.....I can be lazy all day.

Tuesday, January 01, 2013

Regenerating

After all our travels in December, we are sure glad to be home and back to a normal routine. Okay, our life isn't necessarily normal but whose is. I haven't taken down the holiday decorations yet as I want to enjoy them a few more days but I'm sure that by the weekend our house will also be back to normal.

Hubby has been fighting a cold, not sure if he won or the cold but I've been trying to take precautions and boosting my immune system with all kinds of essential oils, vitamins and supplements. I do have a cough but it isn't what it could have turned into and for that I am thankful. I do have a recipe that you can use on the bottom of your feet when you have a cold. I do think it prevented hubby's from getting worse and my mom swears by it. We use it "neat" (3 drops on feet every night) but if you don't feel comfortable with that then you can dilute the 3 drops with a teaspoon of olive oil.

3 drops Peppermint EO
2 drops Eucalyptus EO
2 drops Camphor EO
2 drops Frankincense EO

As I was blog hopping I came across the Camp Wander blog and she has some awesome things to try. Yesterday's post was all about anti-aging and a recipe she has to help regenerate the skin. It of course contains Frankincense. I'll have to try it out. Here is a link to her blog post.

Not only do I feel that this coming year I need to be better to my skin and body but also my mind and creativity as well. Today I started a new year long on-line art journey called Life Book with Tamara LaPorte. I've already started with the first lesson and can't wait to see how the journey goes this year. This piece is my fantasy "Fairy Art Mother". She turned out pretty good and is now hanging in my studio to remind me that whatever I create, it is wonderful and beautiful.

She is made with watercolor and watercolor crayons. If you follow my art blog Basically Art, I will be posting my progress throughout the year.

I have so many more things in the works including a new class for my "Hammered Pendant" and a new "Coastal Cypress" gem tree so stay tuned and for those class dates.

HAPPY NEW YEAR!

It's going to be a great year.

Saturday, October 24, 2009

Sugar Free Pumpkin Cheesecake


Now that the holidays are approaching I thought I would share a recipe with you that I make each holiday season. It is perfect as you get that pumpkin and spice that you want but without all the sugar. Be careful though as it still contains all the fat. This is perfect for those on the Adkins Diet or a low carb diet. The top on mine is a little dark and wrinkly as I left the oven door closed after I turned it off, but I'm sure it will taste just fine.

Pumpkin Cheesecake

Crust:
1/2 cup of Walnuts (I used mixed nuts chopped or you can leave the nuts out and have a crustless cake)

Cheesecake Filling:
3 packages (8 oz each) cream cheese at room temp
1 cup Splenda
1 tesp powdered white stevia (if you don't have this it is fine it just won't be a sweet)
1 tesp ground cinnamon
1/8 tesp ground ginger
1/8 tesp gound cardamom
1/8 tesp ground nutmeg
1/8 tesp ground cloves
1/4 cup whipping cream
2 tesp vanilla extract
3 large eggs
3/4 cup solid-packed pumpkin

Preheat oven to 350 degrees F. Lightly coat a 9 inch springform pan with nonstick vegetable spray.

To make the crust, place the nuts in the work bowl of a food processor fitted with a metal blade (or a blender) and pulse until finely chopped. Press the nuts on the bottom of the prepared pan and bake for 5 minutes.
Remove the pan from the oven and cool completely before adding the filling.

To make the filling, place the cream cheese, Splenda and stevia in the mixing bowl and mix with electric mixer for 3 minutes, scraping down the sides of the bowl with a rubber spatula. Add the cinnamon, ginger, cardamom, nutmeg and cloves and blend well. On medium speed, add the whipping cream and vanilla and beat for 2 minutes. Add the eggs, one at a time, beating well after each addition and scraping down the sides of the bowl. Add the pumpkin and beat until combined. Pour the batter into the parepared pan. Place the pan in a larger pan and put in the oven. Pour enough water into the larger pan to come halfway up the sides of the cheesecake pan. Bake for 60 minutes.

Turn off the oven and open the door slightly. Leave the cheesecake in the oven for 1 hour. Remove the cheesecake from the oven, cover and refrigerate for several hours or overnight.

To serve, take out of the refrigeraterator to warm up a bit (usually 15 to 30 minutes). I usually add whipped cream lightly sweetened with Splenda on top of each serving.

Makes 12 servings with 6 g carbs, 281 calories, 7 g protein, 26 g fat, 1 g dietary fiber, 188 mg sodium, 122 mg cholesterol.

This recipe is from the Ultimate Low Carb Diet Cookbook.

Wednesday, September 30, 2009

Pink Jello Salad


On Sunday we celebrated our daughter and grandsons birthday with a steak and rib cook out. It was one of our good weather days so cooking out was a wonderful option. To go along with that our daughter and family are on the Adkins diet so it was a high protein meal. Lots of veggies and meat, but the special treat was this pink jello salad. My family has made this salad/dessert for years and I remember it at family functions when I was small. If you are carb conscience this maybe a good dessert for you.

Ingredients:
16 oz. Cottage Cheese
1 container Cool Whip thawed
1 can fruit cocktail
1 large package sugar free jello in you flavor choice, but I love the raspberry

Mix the fruit with the jello then add the cottage cheese. After this is mixed then fold in the cool whip. Chill for a couple of hours.

Enjoy and I'll be back tomorrow with a new featured artist.

Thursday, August 06, 2009

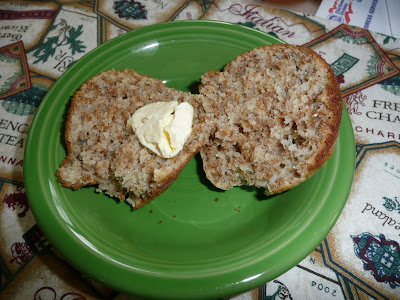
Original All-Bran Muffins

I had to resort to making my own bran muffins this morning as my mother in law who usually makes them is now in an assisted living facility and does not have a stove or oven. I already had purchased the All-Bran, but didn't have the recipe that she uses so I did what any computer savvy person would do and searched the internet and wa-la there it was. Now I don't know if this is the same recipe that she uses or not, but they turned out pretty good. I'll have to take her some later today.


The recipe can be found on Kelloggs.com, but I have reprinted it below. I didn't have fat free milk so I used 2% and I also used Canola oil vs. the Vegetable oil, no other substitutions were made. Please check out the Kellogg website for variations on reduced calories, fat and cholesterol. Enjoy, I know I did this morning.

The Original All-Bran Muffins

Ingredients
1 1/4 cup all-purpose flour
1/2 cup sugar
1 Tablespoon baking powder
1/4 teas. salt
2 cups Ready-To-Eat Cereal All-Bran Original
1 1/4 cups fat free milk
1 egg
1/4 cup vegetable oil

Directions

  1. Stir together flour, sugar, baking powder and salt and set aside.
  2. In a large bowl, combine cereal and milk and let stand for 2 minutes.
  3. Add egg and oil to cereal mixture and beat well.
  4. Add flour mixture and stir until just combined.
  5. Portion evenly into twelve 2 1/2-inch muffin pan cups coated with cooking spray.
  6. Bake at 400 degrees F about 20 minutes or until golden brown.
  7. Serve warm (I also like to have butter on my muffins)


Wednesday, July 15, 2009

Recipes, where do they come from?


My answer to that question is this old cookbook from my grandmother. My great-gran had one also, with lots of hand written notes, but my mom has that one. So, this is what I have to show you. Yes, the Banana Cake and the Cherry Blossom Dessert that I shared in an earlier post came from this book. If not typed in the book then on a scrap of paper as you can see.
The recipe that I'm going to be sharing today came from a friend of mine in Oklahoma. It's Olen's Pasta Salad and I only changed one thing. It calls for 1/4 tesp. of Accent which is MSG and I left that out. It's still good.
PASTA SALAD
Cook 1 lb macaroni and cool

3/4 cup sugar
3/4 cup apple cider vinegar
1 tesp garlic powder
1 tesp dry mustard
1 Tbls parsley
3/4 tesp pepper
1/2 tesp salt
1/2 cup vegetable oil
Mix with Pasta - Set aside

Chop the following and add to the pasta mixture.
1 large cucumber
1 large tomato
1 bell pepper
1 red onion
This is a great salad to take to a picnic as it has no mayo to spoil and it gets better the second day of refridgeration.
Here are a few other pictures of the pages in my recipe book. Enjoy! The first is my grandmothers custard pie recipe...I really should re-type or scan this. The second is for Prune Cake....sounds interesting and it is from my Aunt Rachel. I didn't even know I had an Aunt Rachel...must be my grandmother's aunt due to the date of 1937. The third recipe is my favorite Banana Cake recipe and the fourth is the Cherry Blossom Dessert.


Wednesday, July 08, 2009

Wicked Wednesday - Cocktail Time

Gourmet.com is publishing the recipes for cocktails from the 1940's-2009. They are up to the 1960's and I have chosen those drinks that I have at least tasted. There are some interesting combinations that I never would have thought of and some that I would really like to try like the Mary Pickford from the 1940's. You choose your favorites and have some fun this Summer and be careful of that Zombie from the 1950's.

Of the three drinks pictured the Whiskey Sour is from the 1940's, Grasshopper from the 1950's (not my favorite drink) and the Sangria from the 1960's (sounds good now).


Wednesday, July 01, 2009

Wicked Wednesday - Banana Cake


Okay, if I'm going to eat cake it can't be good for you, but at least this one has fruit. That should count for something. For every major holiday that I have to bake, this is the one dessert that is always great to take to those gatherings. You don't have to wait for the fruit to be in season as bananas are always available.

Ingredients:
½ c Shortening
1 1/2 cup Sugar
2 Eggs
1 tsp Vanilla
2 cups Flour
¼ tsp Salt
1 tsp Soda
1 cup Banana pulp (3 small or 2 large)
½ cup Buttermilk or Sour milk
Optional: ½ cup chopped nuts

Cream shortening and sugar, then add eggs and vanilla. Beat until fluffy. Add milk and banana pulp alternately with the sifted dry ingredients. Beat well after each addition. Bake in 2 - 8 inch pans or 1 9x13 pan at 350 degrees for 30 minutes or until cake is golden brown on top and a toothpick inserted in the middle comes out clean.

Icing:
¼ lb Butter
1 lb Powdered sugar
1 Banana
Optional: ¼ cup nuts

Mix well and pour over cooled cake.

If you would rather use cream cheese frosting, which is yummy, here is that recipe.

Cream Cheese Frosting:
1/2 stick butter, softened
8 oz. cream cheese, softened
1 box powdered sugar (1 lb.)
2 tsp. vanilla extract

Wednesday, June 24, 2009

Wickedly Healthy - Strawberry Banana Smoothie

Since my husband and I are eating healthier, I really can't be posting chocolate cookies or cakes, but I can post smoothies and other yummy recipes that we are trying out that tempt our sweet tooth. We have been making a lot of smoothies and one of our favorites is strawberry. We buy the frozen whole strawberries or mix berries sometimes and use those instead of ice cubes. I also add in a little protein powder for an added bonus especially if this is a meal replacement like breakfast or we don't want to cook for dinner. Here is a recipe I found on Allrecipes.com.

INGREDIENTS
1 cup milk
1 banana
3 large strawberries
1 tablespoon vanilla yogurt
1 teaspoon honey

DIRECTIONS
In a blender, combine milk, banana, strawberries, yogurt and honey. Blend until smooth. Pour into glass and serve.

I would use frozen strawberries and only half of a banana and nix the honey. If it needed added sweetness use a sugar substitute like Equal or Splenda.
Do you have a favorite smoothie recipe?

Wednesday, June 10, 2009

Wicked Wednesday - The Art of the Burger


I found this article on the ultimate burgers on Epicurious.com and thought I would share it as it is grilling season. We all know that greasy burgers are not good for us, but can we make it better? Is it the toppings that make the burger or is it the quality of the meat?

The ultimate hamburger. It's an elusive creation: the perfectly charred crust; the juicy interior with the ideal amount of fat; the full, beefy flavor. To help you get it just right, we consulted two guys who really know burgers: Steven Raichlen, host of Barbecue University on PBS, and Chris Schlesinger, coauthor of The Thrill of the Grill and How To Cook Meat. Read on for their secrets to producing perfect patties.

What cut of meat should I use?
The foundation of a hamburger is, of course, the meat. Different cuts have different amounts of fat and flavor:

Regular ground beef, a generic category that can be any cut or a combination of several, may by law have as much as 30 percent fat. This isn't necessarily a good thing, though—the high percentage of fat can make the burgers greasy.
Ground chuck has about 20 percent fat.
Ground sirloin has about 15 percent fat.
Ground round has about 11 percent fat, making it a favorite of dieters, but producing less-juicy burgers.

Both Schlesinger and Raichlen recommend staying in the middle of the spectrum. "I like equal parts chuck and sirloin—the former for flavor, the latter for finesse," says Raichlen. If you're buying preground beef, remember that fat can be trimmed or added during the grinding process—always check the percentage on the label: 15 to 20 percent fat is ideal.
If you can, though, go for freshly ground meat. When beef is ground at processing plants, bacteria on the outside can end up mixed in, which means that the middle of the hamburger should be cooked through in order to kill any microbes. But when a fresh, whole cut of meat is ground to order by a butcher on a clean machine, there's less chance of contamination.

Should I add any seasonings?
Schlesinger and Raichlen are split on mix-ins. Schlesinger insists his burgers be plain, but Raichlen is open to variations. "Especially if you're going to cook the burgers medium or medium-well," he says, "it can help to add some fat to keep the meat moist." He favors "a pat of butter enfolded in the center" for plain burgers, or grated cheese mixed with the ground beef—his version of a cheeseburger.

Any tips on forming the patties?
"Cold meat and cold, wet hands," says Raichlen. "Chill your hands under cold running water, then work as gently and quickly as possible so as not to bruise or heat the meat." Handling the meat delicately prevents the burgers from getting too dense and firm, and keeping it cold prevents the fat from melting, which would also make the burgers tougher. Both Schlesinger and Raichlen favor thick patties—at least one inch thick—so they can develop a seared crust on the outside while still staying pink on the inside. An additional step that's helpful, but not necessary, is to let the patties rest in the fridge for an hour after forming. This helps them stay together better on the grill.

To salt or not to salt?
"Absolutely," says Schlesinger. Salt is essential to bring out the flavor of the burger, plus it crusts deliciously when cooked over the fire. But if added too far ahead of cooking, it will draw out the juices, drying out the meat. Sprinkle salt and freshly ground pepper very heavily over both sides of the burgers just before you put them on the grill.

What's the best way to cook burgers?
Start with a clean, oiled, hot grill. "First sear them over high heat to develop a crust, then move them to a cooler part of the grill to cook," says Schlesinger. "And be sure not to press down on them while cooking—this will only squeeze out the juices and dry them out." Neither he nor Raichlen recommends barbecue or steak sauces, which just cover up the flavor of a perfect burger.

How do I know when they're done?
Raichlen favors the poke test: "Medium-rare is softly yielding, medium is semifirm, well-done is firm." Schlesinger takes a visual approach, judging by the juices: "When they start to come out of the top of the burger, it's medium. When the juices that have oozed out of the top get cooked (stop looking red and become a bit more clear), it's medium-well." A combination of the two techniques would work well.

Now that we know how to cook our burgers, we need to top them with all kinds of goodies. My favorite is cheese and bacon of course with maybe a little BBQ sauce or A1. What are your favorite toppings or are you a purist?

Wednesday, June 03, 2009

Wicked Wednesday - Cherry Blossom Dessert


I remember making this when I was much younger as it was an easy dessert recipe and loved it then and still do. Try some variations with different pie fillings.

3/4 c. oatmeal
1 1/2 c. flour
1 tsp. salt
1/2 tsp. baking powder
1 c. brown sugar (firmly packed)
1/2 c. butter (softened)
1 lg. can cherry pie filling

Mix first six ingredients until coarse. Press 1/2 this mixture into the bottom of an 8x11 glass baking dish. Spoon pie filling evenly over this layer then top by sprinkling the remaining mixture evenly. Bake at 350 degrees for 30-40 minutes. I always check after 30 and if sufficiently golden brown on top I take it out.

Serve with ice cream or whipped cream.

Wednesday, May 27, 2009

Wicked Recipe - Cookie Ice Cream Cups

Just had to share this recipe. I have guests over occassionally and for dessert and I like to serve simple ice cream and cookies. This would be so much more fun.


Head on over to The Idea Room blog and check it out.

Wednesday, May 06, 2009

Wicked Recipe - Banana Pudding


I love banana pudding and have made it the old fashion way for years with the homemade custard and bananas on top of vanilla cookies, but Paula Dean's cookbook featured this one and I had to give it a try. Be warned this is very rich!

Not Yo' Mama's Banana Pudding
Recipe courtesy Paula Deen
Ingredients
2 bags Pepperidge Farm Chessmen cookies
6 to 8 bananas, sliced
2 cups milk
1 (5-ounce) box instant French vanilla pudding
1 (8-ounce) package cream cheese, softened
1 (14-ounce) can sweetened condensed milk
1 (12-ounce) container frozen whipped topping thawed, or equal amount sweetened whipped cream
Directions
Line the bottom of a 13 by 9 by 2-inch dish with 1 bag of cookies and layer bananas on top.
In a bowl, combine the milk and pudding mix and blend well using a handheld electric mixer. Using another bowl, combine the cream cheese and condensed milk together and mix until smooth. Fold the whipped topping into the cream cheese mixture. Add the cream cheese mixture to the pudding mixture and stir until well blended. Pour the mixture over the cookies and bananas and cover with the remaining cookies. Refrigerate until ready to serve.

LinkWithin

Blog Widget by LinkWithin