Showing posts with label art charms. Show all posts

Monday, February 25, 2013

A Little Charm Fun

Well it was an absolutely beautiful day today and I didn't even step outside. Sometimes I really need to make more time to get out in the fresh air....even though it was a bit chilly but I was out and about all weekend either teaching a class or taking a class so I was glad to be able to just laze about today.

I did finish up some charms for a round robin bracelet exchange. This first one's theme was amethyst. I love the color and the stone so this was pretty easy for me. I wanted something that would mean a lot to the person receiving the bracelet so I fused fine silver and shaped it into the heart form, hammered it and then added small faceted amethyst stones. It turned out pretty good. I'm used to making hearts that are much larger for pendants but it was fun making one smaller.


This next bracelet charm theme was industrial steampunk. Now I don't make many steampunk style pieces so I had a bit of trouble, but I found this Industrial Chic charm, took it apart, wrapped it with some annealed steel and added a few pearls. I think it kind of has a hard and soft edge to it.


I've been playing with setting stones in bezels and am terrible (that's what happens when you try to teach yourself) so yesterday I took a class at Tacoma Metal Arts Center. This is the piece I'm still working on as I need to do some more clean up, polish and then set the stone in the bezel (it is just sitting in it right now). I'm liking the mixed metal look of the copper and silver bezel. I'll be sure to post a final picture when I have it finished. I highly recommend the metal classes by Amy Reeves, she was patient and offered lots of suggestions even to me when I wanted to try a much larger piece then the rest of the class and I wanted to try to solder a silver bezel to copper which I guess can be a little challenging. I'm always up for a challenge.


Be Safe, Be Happy and Be Healthy

Saturday, January 26, 2013

Continuing...

At the start of every new year I always make it my goal to clean my craft room. This year is no different but I'm finding it much harder. I've started destashing some beads and getting rid of items I don't use any longer and I even moved some fabric that I use for donations to an under the bed box. I still have too much and not enough things/boxes to organize everything in. I did finally get my yarns in a box instead of a bag, but now to find a place for it. Oh, to have a bigger room. On second thought, I would just fill the bigger room with more stuff so we won't go there. So, I continue to try to organize until I need to work on something and out everything comes again to the point it's hard to walk or even find the table top. Did I mention this room is only about a 7' x 9' room at the back of the house and floor space is a premium. Probably the same size as my laundry room so not very big.

I do get discouraged as I walk into that small room and realize I have no idea what to do to make it better except to get rid of a lot of stuff. Although I do know that if I get rid of something, I'll probably need it next week for a different project, no best idea is to continue trying to organize. So I push on.

For those of  you that have not seen my little slice of clutter heaven. Here is a pic when it was nice and organized with new cabinets. Wish I could see that table top now.


I won't even show you what it looks like now.

In hubby's and my quest for better heath this year we purchased a new cookware set. Okay so I have to tell you a little story first before I get to that. When we got married I had cookware. I purchased the set back in 1978 or so right out of high school. Paid it off with payment plans if that gives you any indication of how much it was and used it up until we got married. Great cookware but hubby didn't want to cook in stainless steel so we packed it away in the garage loft and forgot about. So the daughter calls and says she is having a cookware demonstration at her house and would we come to dinner. Okay, sure why not. I had a feeling it was the same cookware I had in the loft and said so but we went.

Talk about a surprise, same cookware that my mother had which was a step above my old set and expensive but fixed great food with no oil and no water. Yes, this is that famous waterless cookware. Hubby loved that it packed well and you didn't have to use water and you could fry without oil and cleaned up like a breeze. I was even more impressed with the baking soda test. Most stainless steel will pass the test but we had some annodized aluminum and cast iron we were using that would not pass. Try this test. Two cups of water in one of your sauce pans and a teaspoon of baking soda. Boil. Take a small taste. It should taste like baking soda and water right, well if you used something other than stainless it tastes like poison. Not good. I just can't imagine that cooking veggies or anything else in those pans wouldn't alter the taste of your food. So out they went and hubby was up in the loft looking for my old set. Now did I say we bought us a new set...yes we did, but never fear we are not getting rid of my old set it will be put to good use in our motor home as we get rid of the pans there.

You know a lot of what the salesman said was true, we replace appliances costing thousands every few years (they just don't make them like they used to) and even replace our pots and pans when the coating starts to wear out but how many of us can say that we have cookware that will last our lifetime. I do and now I have a second set that will be even better. I can't wait to get it and start learning to cook all over again.

Now I sound like a commercial but really can you place a value on your health? My hope is that we will start cooking healthier and be healthier for it.

On the workbench this week.
Wire wrapped coins. Inspiration from a post on Pinterest.

My hand at attempting to make a wire frog. Still working on it.

Charms for a swap called "Where you live". The beach glass was given to me by a friend.

Charms for another swap that was Pink and White and since it is so close to Valentines Day I made hearts,

New shower curtain hooks and a little bit of bling in the dangles. I posted this picture on FB and everyone voted that the dangles should stay so each hook has it's own dangle of crystals and pearls.

Now that I look back at what I did this week I don't feel too bad that my craft room is such a mess. I was still able to play and found enjoyment in what I did accomplish. 

Here's to having more fun next week.

Tuesday, October 30, 2012

Spooky Bracelet and a Blog Hop

As promised yesterday here is my Halloween bracelet I made with the charm swap hosted by Thespa at Vintiquities Workshop.  This first picture is of my pendant. I had charms left over so I fashioned the word "Boo" from wire and then attached the charms at the bottom. Now I just have to add my chain. The charms were all awesome and creative. Thanks to Thespa for organizing.


Now if you would like to see all the others bracelets created by the participants click HERE. She also has some fun Halloween printables that would be fun to play with.

Happy Halloween everyone and let us all remember the folks affected by the huge storm Sandy on the East coast. My thoughts and prayers are with you all.

Wednesday, June 13, 2012

Having Fun With Charms

For the past several days...okay more than a few days, I've been trying to get caught up on all the art charm swaps I'm in. I am hosting a Postal swap and a Pendant swap and like a sucker I just couldn't resist signing up for 2 sets each.

The pendant swap was pretty easy as I love to play with wire. So I made several different types of wired up pendants. These first ones are all the same and I call them my crystal ball pendants as they are made out of quartz crystal.


This next set was me just playing around. It was kind of fun.

Then the hard part started.... My postal charms, oh what to make. I was not very creative at all and finally decided to make my soldered charms for my first set. I just love these. I used mostly old stamps that my husband had rejected out of his collection. Can you believe we found one in here from 1895. Yup, someone is going to receive that one in a swap.

My next set was harder to figure out and finally I just glued a ton of postage stamps to a piece of card stock as a collage and then used Diamond Glaze to affix a glass piece over the top of the pieces that I cut out. A simple coil and loop for the hanger a little more Diamond Glaze on back and there you go, postage stamp charms. Probably out of all of them, these are my favorite because they are so different.

Another swap I signed up for was the Amulets and Talisman swap. This was hard. I did lots of research and several test charms. It was hard keeping them to under 1 1/2". The bottle charm got kicked out as it was too big and I ended up not liking the triangle with the eye in the middle. So four different charms the amulet bag made out of leather and filled with various protective stones, the symbol of the moon out of silver with crystal, the wishbone in gold (not really just brass) and the protection amulet with a binding and protective stones.

So, I think I am now all caught up. Whew, that was a lot of charms. I can't wait to see what I get in return.

One more thing, I have a Bonsai Gem Tree class coming up June 30th at Shipwreck Beads in Lacey, WA, so if you have been wanting to learn how to make a gem tree, this is a great starter class. Come have fun with us.


Friday, May 25, 2012

Struggling with Design

Today I am beating my head against a wall. I have indecision with me and I really don't like him. Note I did call it a him as that is what I believe it to be as my muse is a woman. I've been working on some Amulets and Talismans for a charm swap. I've done quite a bit of research so they at least look somewhat authentic and then just trying to figure out how to craft them was giving me fits.

Here is what I have so far:

We are challenged by size as we can't go larger than 1 1/2" in length so I immediately have to eliminate the bottle with all the healing and protection in it (agates, seeds, salt, rosemary) as it will be too long. I don't like the triangle with the eye in the middle... it just needs something more. The other four, I'm okay with. Would love comments, ideas or anything else you might suggest.

I made some really cool crystal ball pendants that would have been great for this swap this past weekend but alas they are too long, so they will get used for a pendant swap. I think the rock crystal is about a 16mm.


If I would have thought about it, I could have gotten some a bit smaller. I think they would have made a great charm and had significant meaning.

Well, If I'm going to get finished with these blasted things I better get back to it. Have a great Memorial weekend and be safe. I'll be posting an update on my art blog later today if you want to check that out.

Cheers, Dana

Friday, May 04, 2012

May Already

I really can't believe how fast this year is flying by. Already it is May and I don't feel like I have accomplished anything but then again what am I to accomplish?

My last post was when we were demonstrating at the West Seattle Show and after that we took a little trip to Eastern Washington to the Spring Barrel Tasting and spent time with family. I have a couple of favorite pictures that I was able to snap while we were there.

My Brother and DH enjoying the scenery from Terra Blanca Winery.

My mother and SIL inside Terra Blanca.

I just realized that while we make the excuse to go to E. WA for this event the main reason is to be with family. We don't have to many family get togethers where we can just sit and read or share a great glass of wine and eat to our hearts content and not have to worry about going somewhere, like home in a few hours. We all converge on my brother's house, DH and I sleep in the Motorhome and the others inside. It's hard to explain the noise, peace and love that can all happen at once. It really is a special time that we wouldn't give up for the world.

This week I've been working on ArtCharms and findings. I had a couple of swaps that I wanted to finish up one was a Sewing theme and I made hook and eye closures... these were fun.


These were made for a Pendant/Focal Swap.

And if that wasn't enough I decided to develop a new class for Shipwreck Beads called Simply Findings. So I made my samples, submitted my proposal and took pictures for their web site. I am happy to announce that I'll be offering this class starting in July. I'll be sure to post more when I have the actual dates and times.

I think for now I'll be cleaning off my studio desk and get ready to do some painting. I've been missing my art for the past couple of weeks and it's time.

Have a great weekend.

Sunday, April 01, 2012

Home at Last

Well we have been home for several days and it feels like yesterday. I really can't believe how time flies. If you check out my ART blog you will see some of my fun old book finds and what I plan to do with them.

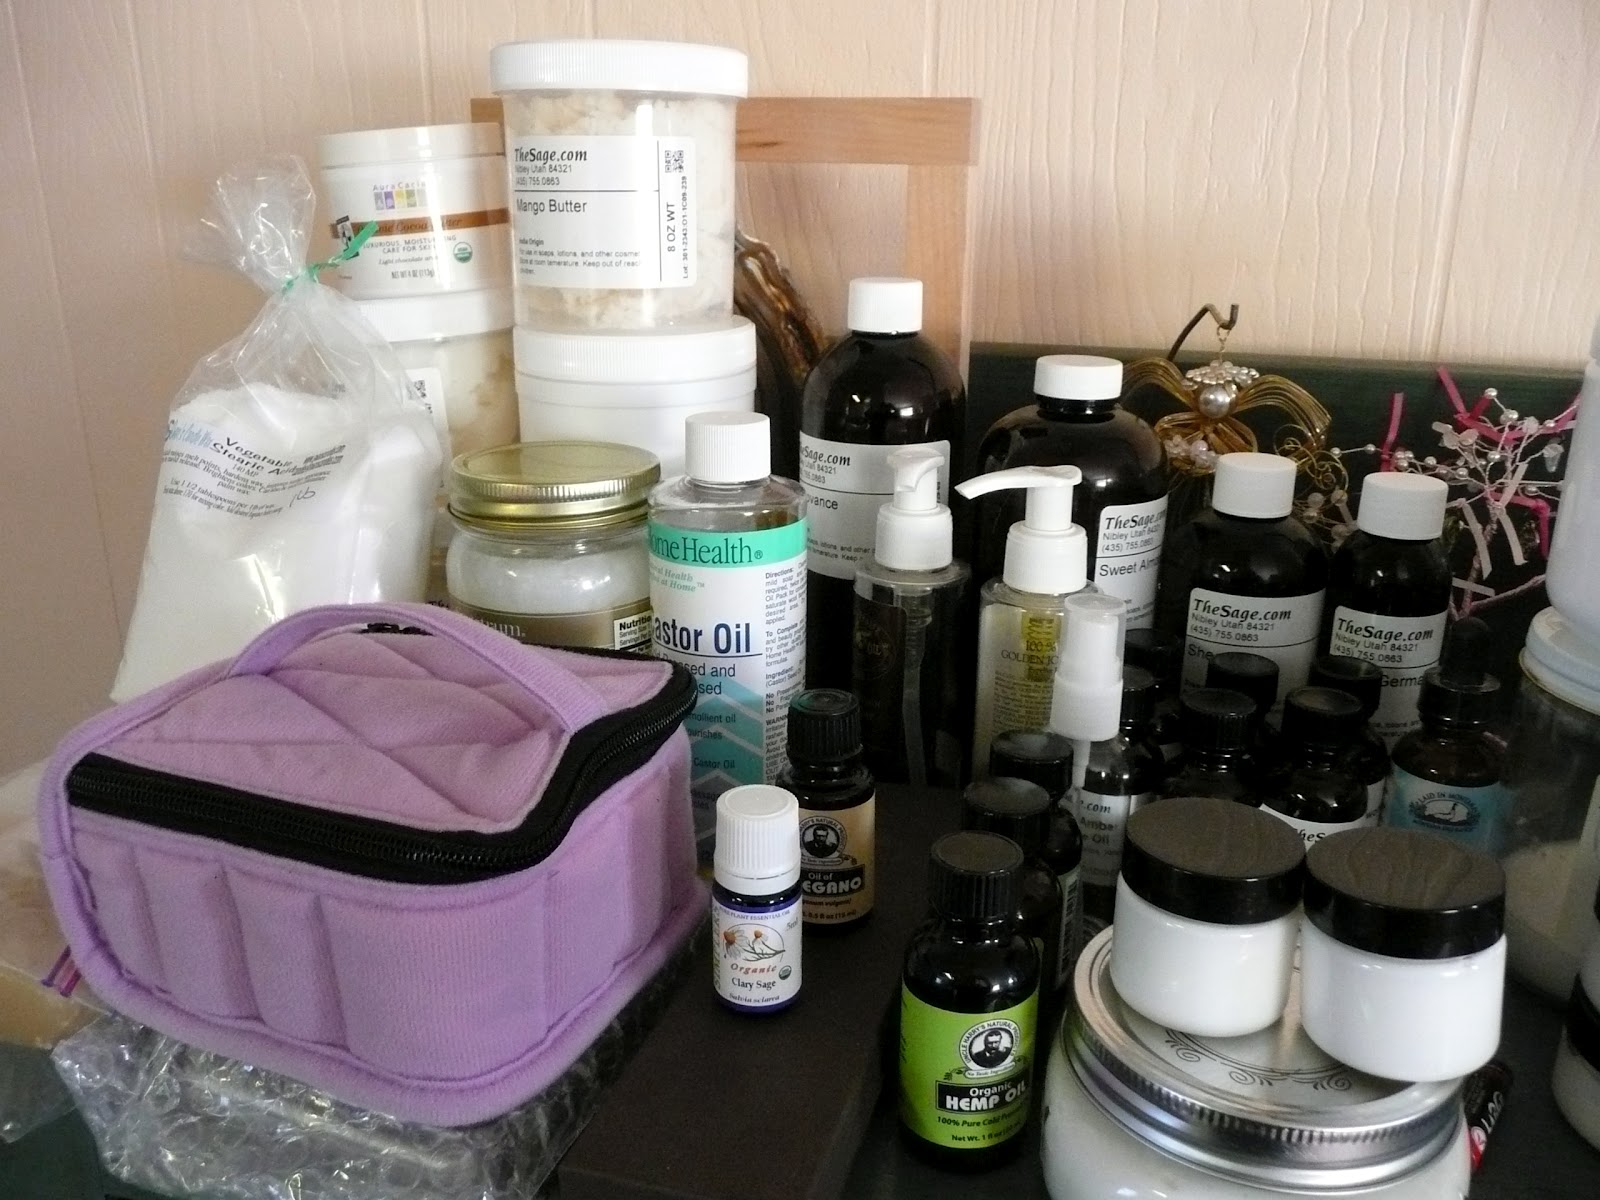
One of the first things I did when I got home was make some more body cream. The last cream I made was a face cream but this time I wanted to add some Coconut oil (shouldn't use that on your face) to see how it would work. So I played around with my recipe and got to work. This one is really moisturizing but too thick. I think I'll try it again using less if no Stearic Acid.


It has a nice light scent of coconut but it doesn't linger after you put it on. If you want the recipe, leave a comment with your e-mail and I'll send it to you.

I had someone ask me about all my supplies... well they do tend to grow like any hobby that you start to get into. The little purple bag holds most of my essential oils. Here are the essentials that you need to make your own lotions and creams.

  • Scale
  • Whisk or stick blender
  • Pyrex measuring cups (I use a 4 cup and a 1 cup)
  • Containers
  • Spring water or distilled water
  • Oils (various...could be grape seed, olive, caster, sweet almond, jojoba, coconut, sunflower, cocoa butter or more exotic like mango butter or Shea oil.
  • Emulsifying Wax (this is to help your water and oil blend together and not separate)
  • Preservative (I use a paraben free one that you can get at www.thesage.com)

I'm sure that most of you have some of these ingredients already. If you don't want a preservative in your lotion then you will need to either keep it refrigerated or use it within 2 to 3 months. The Sage blog has all kinds of recipes and shows steps in making your own lotion so check it out.

I did play with making some charms this week. I had to finish up a set for the Springtime in Paris swap (forgot to take pictures) and now I'm working on Nest charms for another group. These are fun but I have to make a total of 18 of them - only 9 more to go.


Next up is a button swap hosted by Cindy Wimmer over at Sweet Bead Studio (see button on the right top). I have a growing collection of buttons and thought it might be fun to do a little blog hop swap. I also found some really cool old metal buttons while at the antique store shopping yesterday. I'll be sure to post my finished creation here at well as on my ART blog since I'm not sure if it will be art or jewelry... maybe a little of both?

Have a great Sunday.

Wednesday, March 07, 2012

Playing with Wire, or is it Fire?

Do you ever just an idea but can't figure out how to make it into something? Well that was me yesterday. I went into my studio/craft room and decided to just play for a bit with no pressure to make anything. Low and behold, I was able to do a couple of new things with wire. This first is a spin-off from my Crystal Ladder Pendant and is a Lark's Head knot. To do it in leather, string or ribbon is one thing but to do it in wire.... oh my !!! Fingers hurt. I did come up with a trick... probably not new to those of you that love to work with wire, but you heat your wire with a torch until it turns red, quench it in water and start looping. If the wire gets too stiff again, just heat it again.

Once you are finished, if you don't like the antiqued look of the fire scale then you can put your piece in pickle and then polish for that bright shiny look again.


This piece was made using 14 gauge copper which makes it a heavier piece. I've decided I like the curled ends versus those that have the small balls. I even made a pair of earrings using 18 gauge wire. Lots of fun once you get the hang of it.

Now these are probably going to be my favorite earrings and and I'll just have to make me a pair in silver.


These head pins were made using 18 gauge wire and I love the effect of the simple knot on the end. I may have to wear these tonight.

I've also been working on some art charms for a swap. I previously showed you some of my wooden "Z"s that I was tangling on well these are mini bottle caps that I inserted a small piece of an original Zentangle. These were a lot of fun. I still have a couple more wooden pieces left to complete to finish out my set.


I hope everyone is having a great week. 


Sunday, February 05, 2012

Lazy Sunday

Sunday's always tend to be lazy around our house... okay that is most days but especially true on the weekends as we don't like to get out and go shopping on Saturday or Sunday due to the traffic and amount of people in the stores. Don't get me wrong, I'm not phobic about crowds but it does get tiresome when you are trying to shop and there are long lines and impatient people. We just go during the week and it is much calmer. We will go to my mother's today (first time for DH to be out around people since surgery) for snacks and football, so that should be a welcome change for a little while. I'm sure most the country will be watching the game, now who is it that is playing again.... lol, can you tell I don't watch football... I just watch it for the commercials.

One of the projects I mentioned last post was my little bags for the kids in the oncology department at the local children's hospital. Well here is a picture of the first batch ready to be delivered.


They could be drawstring or snap close but not buttons as they were afraid the buttons would come off, so I did a mix of both. My kid theme fabric was sorely lacking but I think this is a good start. If you would like to donate little bags (mine are 4 x 5 and smaller) or material, please contact me. You would get a donation receipt for tax purposes. You can contact me via the e-mail me button on the left hand column or leave me a comment with your e-mail address and I'll contact you for specifics.

In getting back in the swing of things, I volunteered to host an art charm swap. This one has a Zentangle theme. Oh, what fun will these be. I have only done Zentangles on paper but wanted to try to do some on pieces of wood that I could make into a charm so I found these small "Z's". I'll drill a small hole at the top and insert an eye pin so that they can hang. I think I'll have to get more of these as they were really fun.

This is the front.

The back.

As you can tell I did the front and back as well as three of them around the edges. If you like Zentangles and want to find out more about them or how to make them, then visit www.zentangle.com. There are also a ton of books available that are a great inspiration.

I love making things, as if you couldn't tell that already, and for the holidays I made homemade hand lotion and cream. Well now I'm developing my own recipe (I used someone else's before). The first batch didn't turn out quite the way I wanted and felt a little gritty in the liquid state but was fine after you rubbed it in but I still didn't like that feeling. The second batch turned out much better with just a few modifications and additions. I did try to fix the first batch this morning, hopefully the gritty feeling will be gone once it cools.

Second batch, cooled lotion.

I also made some cuticle cream and have a recipe that I love. I added a touch of lemon and lavender essential oils and it smells really good. It would also be good on rough scaly heels and feet.

All of the lotions I'm making have a paraben free preservative, so I feel much better about using them and giving them as gifts. DH asked me last night if I was doing this as a hobby or if I intended on selling them and I'm still asking myself that question but my first answer is that I want this as a hobby to use the products for myself and give as gifts. If those friends and family start coming back to me for more between gift giving then I might consider taking money to help offset the cost of materials, but right now I'm having too much fun playing.

Wednesday, February 01, 2012

New Projects

I finally finished my rag quilt yesterday and DH has been using it ever since. I got the idea to make one from my sister-in-law who has one and I fell in love with it when visiting during the holidays. Hers was a bit different as it had squares and rectangles and I just used squares. The next one I may do some rectangles or triangles, who knows, but I wanted to do one and finish it before I started something else.


Rag quilts are made with flannel, squares are quilted and then sewn together with the seam out on the front side. The seam is clipped just up to the sewing line all around. When you wash and dry, it will get softer and the seams will fray and get all cool looking. It is just a cozy quilt to curl up with on a Winter's night.

Since I finished the quilt, I started working on some art charms for a swap I'm in. I've talked about this Art Charm group here before but for those of you that don't know, it is a Yahoo group formed by the authors of the book "Making Mixed Media Art Charms and Jewelry", Christine Hansen and Peg Krzyzewski. I have a button on the right hand column if you are interested in checking it out. We have a ton of fun. This swap has an Ancient Egyptian theme, so I've been researching symbols on the internet. If you have any ideas, I'd love for you to leave me a comment.


I chose to use copper wire and turquoise for my stones. I like how the little stone charms with swirls turned out but not so sure about the lotus flower... looks more like a lobster to me in the heavier gauge wire. LOL The pyramids aren't bad but the rectangle with the wavy lines is the symbol for "pool of water" and I like that one the best. Too bad it takes the most time to create. I need to make 20 of these puppies. I may end up with a mixture of different charms but I think the lotus flower is out.

Just because I didn't have enough to do, I volunteered to work on a project for the Orthopedic Association for the children who are patients in the Oncology Department at Mary Bridge Children's Hospital. The kids get tokens when they get poked or a dressing change and then they can turn those in for a prize but they needed something to keep their tokens in. So, I'll be making little drawstring and snap baggies for the kids. I went through my stash of cotton material and found some that was kid themed and started cutting and sewing.  As I told the organizer of this project that I wanted it to be on-going, I probably will be needing more material. If you have any kiddie cotton that you want to donate to the cause, I would love to take it off your hands. I'll post a picture when I get a few of them completed so you can see what they look like.

Cheers, and have a great week.

Tuesday, October 25, 2011

Holiday Swaps

For the past week I've been having fun working on some art charm swaps first my Autumn Quick swap and now the Christmas Ornament swap. For the Autumn swap I made some wire leaves and some tree of life charms.


I had a hard time coming up with any ideas for a small ornament charm so I made three different styles. Then since this is beginning of the holiday season I painted some holiday tags to go with them. I love the tags so I'll probably make more to put on my packages this season.


The small tag charms are wood that I covered with holiday scrapbook paper, painted the edges, glued a metal sentiment on the front and sealed the whole thing with Glamour Glaze. The round balls are scrapbook paper rounds that I folded in half and then glued to shape a ball, then inserted a head pin with a small pearl and then sealed it. The third charms are swirls of gold tone wire with a large amber crystal in the middle. Now to put these all together and get them mailed to the swap hostess.

Hopefully everyone is having a great week so far. Today I had to take the little monster Leo to the vet to get his annual shots. He was such a good boy and now is crashed out on the pillow on the couch. He wasn't about to look at me so that I could take his picture...humm I think he might still be a little mad.


I'll leave you tonight with this great shot from our vacation of the locks at the Panama Canal. Hubby has really gotten into HDR photography and this is one of my favorites that he has altered.


Friday, September 23, 2011

If you are looking for the Bead Soup Party post, click HERE.

Guess what Peg comes today and I finally get to meet her and talk to her in person vs. just on the computer or phone. Now you are wondering who is Peg. Well she is the one and only co-author of the book Making Mixed Media Art Charms and Jewelry. I started making these little works of art last year and fell in love with them. They are addictive. If you have read my blog before then I'm sure you have seen some pictures that I've posted. Here is one from last year.

If you are interested in checking out Peg's book, it is available on Amazon.com. Peg also teaches at various art retreats around the country and soon she'll announce a new teaching venue for her and it might be in international waters. I'm seriously thinking about going to that one.

Speaking of art retreats, I did submit teaching proposals to three for 2012. Maybe I'll hear back from at least one of them. Just to give you a clue as to what I would be teaching....it would be gem trees or a form of gem trees as some of them don't have gemstones on them at all. More about that coming.

Have a great weekend.

Tuesday, June 21, 2011

What Would We Do Without Hobbies?

I don't know about you but my craft room is overflowing with stuff. I organize and put things away just to get it all back out again. I have a wonderful table that is quite large for the very small room (we put it together in the room) and I seem to only have about 12" of space to work in. I guess when I had the smaller table I had even less working space but really. I do have a ton of hobbies stored in there (room is only 7x9) from all but business jewelry making stuff to my sewing machine, plastic totes of fabric, sewing notions, gem trees and supplies, ATC stuff, rubber stamps, altered art, crochet books and yarns, beads, beads and more beads along with torches, firing bricks, hammers and all those metal working tools. When I think about all I have in that small little room, I'm kind of amazed I have any room to work at all.

I was hosting an art charm swap with a 4th of July theme and those all got mailed this morning so I was able to organize it a bit more. Here are the few jewelry pieces I made out of my stash of charms. I'm sure I will wear the earrings and necklace more than the bracelet but I like the look of the bracelet and after the holiday will hang it on the wall with one other one.


I also started working on some ATC's for a swap with the Red Lead Yahoo group, I haven't swapped with them before and am looking forward to it. I love ATC's as they are little works of art that you can store in a book if you don't want them out. Most of mine I keep in a sports card collectible sleeve in a binder as they are the same size as the baseball or football cards. These are the ones I finished up today.


Now to go and clean up my mess yet again. Maybe this time I'll actually put the boxes away in the cupboard where they are supposed to be versus on the floor.

I guess one of these days I'll have to post some of my jewelry creations with you. I do have some special orders to work on so I better get crack'n.

Hope everyone is having a fantastic week.

LinkWithin

Blog Widget by LinkWithin