If you were wondering how I made those beach glass pendant/charms, here is a picture tutorial. The wire I used was 24 gauge silver craft wire (copper core) or you could just use 24 gauge copper wire. It is best if you are using soft wire.
I used 2 pieces cut to 12" each and wrapped them side by side for a double wrap. Every piece of my beach glass turns out differently depending upon the glass. A simple wrapped loop at the top (short wires were cut off flush with the wraps and tucked in) longer wires were wrapped around to the back and secured.
My advise is don't make this harder than it is. You could probably wrap a piece of pottery shard or a tumbled stone the same way. Humm, maybe I'll try the stones as we have quite a few.
This was Create Day 7 and I did make more charms for my charm swap along with making this funky picture frame wire structure to hang charms from. I think I'll paint the back board cream or white or maybe glue paper to it.
Have a good evening.
Sunday, November 07, 2010
Saturday, November 06, 2010
A Little Creating and Making New Friends

Today was my Demonstration and Book signing at Shipwreck Beads in Lacey. Usually these things can be pretty boring if you don't have a lot of people dropping by to check out what you are doing. I actually was able to make 3 gem trees and promote the classes that I'll be teaching there.
Other than making trees and talking to customers today was an exceptional day as I was scheduled at the same time as another author for her book signing. What fun! I was able to meet Christine Hansen, author of Mixed Media Art Charms & Jewelry. If you haven't checked out her book that she co-wrote with Peggy Krzyzewski then you need to, lots of fun charms to make.
Here is a picture of one of my trees...taken with my cell phone camera so it isn't very good.
Here is a picture of Christine making her first charm tree. If you like this tree, I have a tutorial so that you can make your own. Here is the link Jewelry/Earring Tree.
Speaking of trees, my brother made this tree with my Tree of Hope and Life instructions. He used more bead dangle charms vs. some of the ribbons I use but I love how he put it in a dish with sand and made a zen garden.
I hope everyone is having a wonderful weekend.
Friday, November 05, 2010
Tutorial - Crystal Ladder Charm or Pendant
Here is my tutorial for November. I made one of these in September while playing around and received several compliments that I decided to share the instructions with you. If you find any problems with the instructions or have questions, be sure to ask as I took the photos over a week ago and am just now getting to writing them down and I might have missed something. If you see in the instructions that I have indicated soft wire it was to make it easier on myself in making this charm. You could try aluminum wire as it is also easy to work with. I always use copper as my practice wire as it is so much cheaper than sterling.
Crystal Ladder Charm
Instructions:
19. Continue turning the charm over and adding beads until you have your desired length
22. One side of your wraps will be longer than the other side…this is okay
23. Trim close to your wraps on the longest side then match it with the other side
24. File your end wires so they are not sharp
25. All finished except for your jump ring
26. Side view reminds me of a ladder
27. These can be any length you choose. Try a longer one with 4 to 5mm beads for a pendant
I hope you enjoy this tutorial. These can be a little tedious to make but once you get your charm form completed adding the beads is a snap. You can also darken your copper by putting it in a solution of Liver of Sulfur and then using a polishing cloth or pad to take some of the dark off leaving it only in the crevasses.
Crystal Ladder Charm
Supplies Needed:
- 24 gauge wire (soft such as copper or sterling or fine silver)
- 18 gauge wire (soft such as copper or sterling or fine silver)
- Wire cutters
- Round nose pliers
- Flat nose pliers
- Jewelry hammer
- Stainless steel block or another hard surface for hardening and flattening your wire
- Ruler
- 3mm beads
- Metal file (not shown)
- Gather all your supplies prior to starting
- Cut 5 to 6” of your 18 gauge wire
- Fold your wire in half making your folded end pretty small but not flat against each other
- Curl the ends of your wire around and back through the folded end (Larks Head knot)
- Using your round nose pliers making your loop smaller by pulling the ends of your wire through the loop tighter
- Continue making the loop smaller
- Even smaller loop…note mangled wires…not to worry we will be flattening and straightening them
- Using the flat part of your hammer lightly pound the end wires to straighten them
- You may also use your flat nose pliers to straighten the wire even more
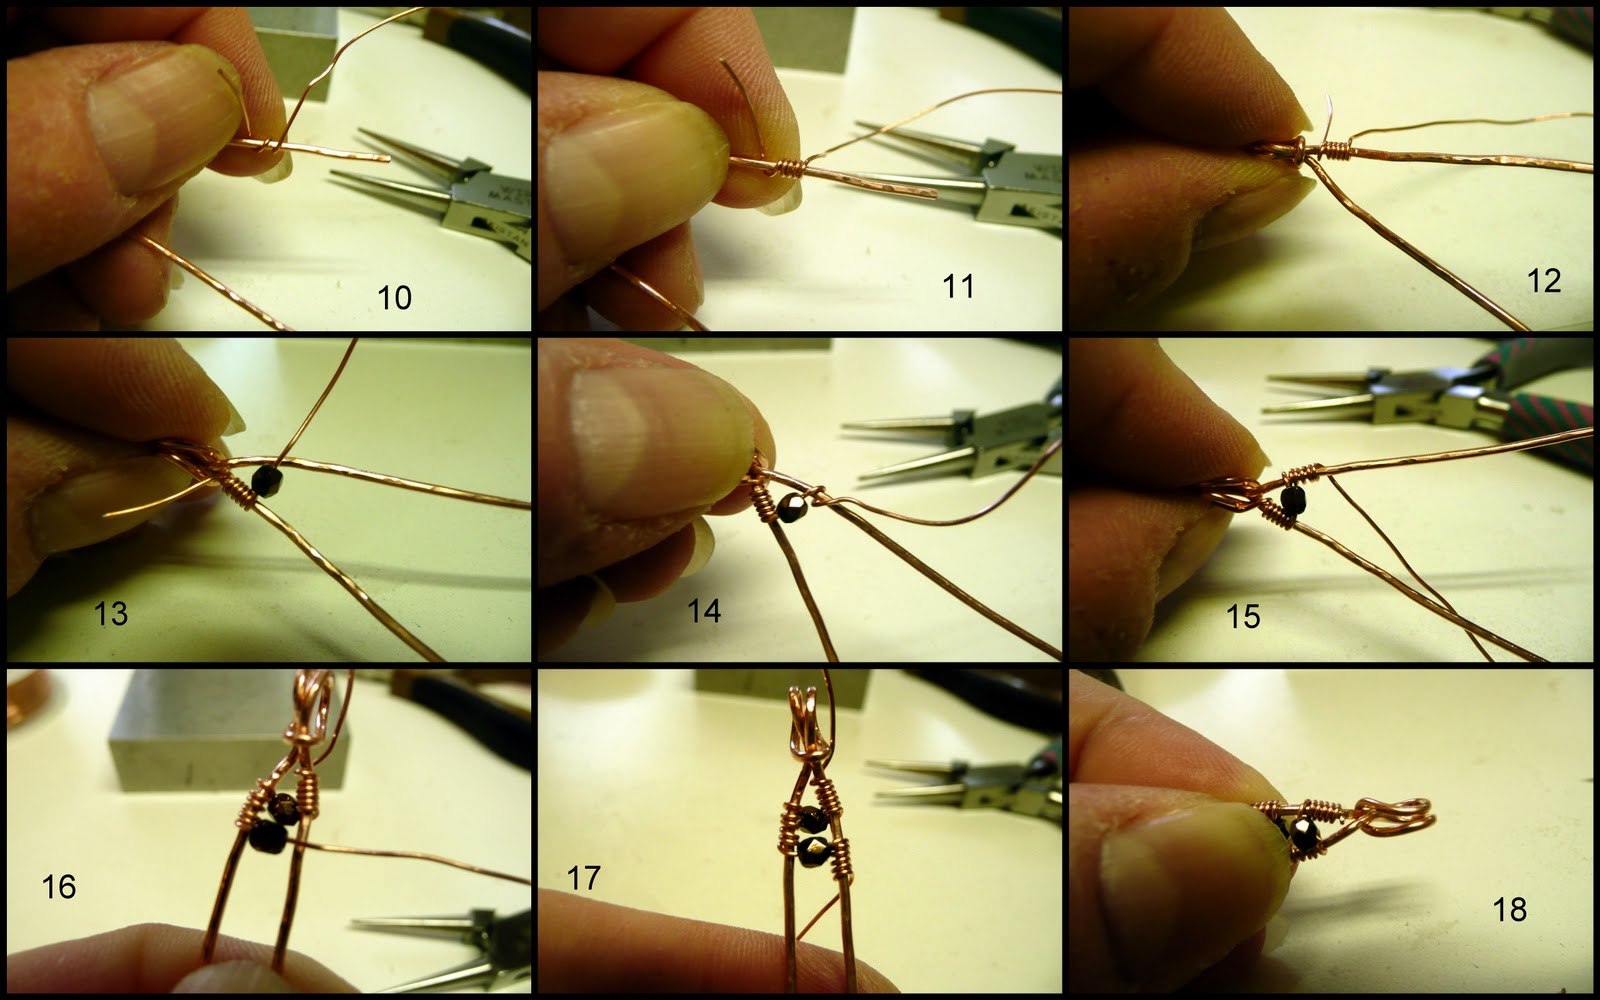
10. Cut a 12” length of 24 gauge wire. Start wrapping with one end of your small gauge wire around your wire form
11. Make about 4 to 5 wraps
12. Move the wraps up to the top of your wire piece, leave the tail as we will trim it later
13. Add one bead on the longest end of your 24 gauge wire and center in the middle of your charm
14. Wrap the loose end of your wire around the opposite charm leg
15. Continue wrapping about 4 or 5 times
16. Turn your wire charm over and add another bead holding the heavier wire together against the bead
17. Wrap your wire on the opposite charm leg as you did previously
18. Trim the extra wire from the top of the charm and tuck the end in tight to the middle
11. Make about 4 to 5 wraps
12. Move the wraps up to the top of your wire piece, leave the tail as we will trim it later
13. Add one bead on the longest end of your 24 gauge wire and center in the middle of your charm
14. Wrap the loose end of your wire around the opposite charm leg
15. Continue wrapping about 4 or 5 times
16. Turn your wire charm over and add another bead holding the heavier wire together against the bead
17. Wrap your wire on the opposite charm leg as you did previously
18. Trim the extra wire from the top of the charm and tuck the end in tight to the middle
19. Continue turning the charm over and adding beads until you have your desired length
20. To finish off on your last bead wrap, loop the end wire back through the middle of the charm and to the top of the last beads wraps
21. Wrap two or three times to secure22. One side of your wraps will be longer than the other side…this is okay
23. Trim close to your wraps on the longest side then match it with the other side
24. File your end wires so they are not sharp
25. All finished except for your jump ring
26. Side view reminds me of a ladder
27. These can be any length you choose. Try a longer one with 4 to 5mm beads for a pendant
I hope you enjoy this tutorial. These can be a little tedious to make but once you get your charm form completed adding the beads is a snap. You can also darken your copper by putting it in a solution of Liver of Sulfur and then using a polishing cloth or pad to take some of the dark off leaving it only in the crevasses.
Thursday, November 04, 2010
Calmness Created
My goal today was to clean and organize my craft room. I was just feeling stifled in there with the mess. When I get into a project, everything comes out and ends up on the floor, on the table top and sometimes hanging from the cabinet handles. It didn't help that I had been working on several projects at once. Most of the table top was cleaned off, boxes on the floor are more organized even though they are still on the floor...must get those in the cabinet tomorrow, all the stray bits of fabric, paper and wire have been thrown away and most importantly the glue and paint have been scraped and cleaned off my table top (I even had to clean some paint off my sewing machine...don't know how that got there). I feel so much better that I actually was able to get some pictures taken of the art charms I received from the previous swap and make some bullet charms.
Here is my wire tree with all the art charms. Amazing when you see them all together.
Now....drum roll please.......the bullet charms. This was my first attempt and they are so addictive. I had made 10 in no time flat. Problem with these silver tone ones is they don't have the same chime as the brass.
I need to redo the one with the crystal on top as the plastic is too large and detracts from the piece, so I'll remove it and put it all back together. Maybe I'll continue going through the stash to find some that tinkle instead of going thud when the bead in the middle hits the casing.
To close out the day here is Buddy on his new Snuggie pillow with his toy.
Have a good night all.
Here is my wire tree with all the art charms. Amazing when you see them all together.
Now....drum roll please.......the bullet charms. This was my first attempt and they are so addictive. I had made 10 in no time flat. Problem with these silver tone ones is they don't have the same chime as the brass.
I need to redo the one with the crystal on top as the plastic is too large and detracts from the piece, so I'll remove it and put it all back together. Maybe I'll continue going through the stash to find some that tinkle instead of going thud when the bead in the middle hits the casing.
To close out the day here is Buddy on his new Snuggie pillow with his toy.
Have a good night all.
Labels:
art charms,
creating each day,
Dog
Wednesday, November 03, 2010
It's a Struggle
We all have our ups and downs and now more than ever with the holidays coming up we need to be focused....okay maybe not you but I do. This is day 3 of the Create Every Day and it seems all I did in my craft room was create a mess today. I don't think that qualifies, but I did fix 3 bracelets for a customer and make a necklace for me, so I guess I did get some creative time in there. I have all these ideas for things to make but just can't seem to get it out. I think I really need to clean up my craft room so that I can find those things I want to make. Maybe that will be my focus tomorrow is to create a cleaner craft room.
Here is my new necklace (the blue is AAA grade Kyanite that I had been saving that I purchased at the Tucson Gem Show...I don't know what I was saving it for and the other two briolettes are pink amethyst).
This photo is of some more charms for a charm swap. I'm especially liking the mini tree of life charm and the long glass tube is a glass fuse.
I seem to pull this piece out every once in a while. It is a concept piece that I call Imagination. I have created a button tree and mounted it on a base of collage. Truly mixed media. What I did yesterday was add the fabric around the outside edges.
Here are a couple of holiday themed Artist Trading Cards. I'll probably be posting these on my ATC group for a swap.
I did have time yesterday to go through one of my new books I had ordered. This one is called A Charming Exchange by Kelly Snelling and Ruth Rae. I was really looking forward to getting this book as I love my Mixed Media Art Charm book. If you need ideas then this book has it. There are several tutorials throughout the book which are very well written and appear to be easy to follow. I love how there are several artists featured in the book as it does give you a variety of styles and different points of view. If you are looking for a new book to give you inspiration or maybe to take your jewelry design in a new direction then the book is well worth checking out.
Well besides cleaning up my craft room tomorrow I should probably do some laundry, then we will see what I have time to create. If you haven't had a chance to visit the blogs of folks that are creating every day, take a moment and check them out. The links are on the right hand side of this blog.
Monday, November 01, 2010
Beach Glass Anyone?
It was a rainy cold day here in Western Washington and after going to my exercise class this morning I decided to spend a little time in my craft room. I had been wanting to use some of my stash of beach glass in pendants or charms so I grabbed my jar and dumped the contents on the table. I started out looking for blue and white pieces for a charm swap I'm in but unfortunately that wonderful shade of blue beach glass was elusive today and I only found one piece. I did find some white, green and brown. These were so much fun to make. Most are large enough for a pendant but the smaller ones I'll save for a charm bracelet or a different swap. My favorite is the light green with the silver wrap with the brown piece coming in a close second.
Since I have so many, maybe I'll list a few for sale or save them as Christmas gifts for family and friends.
Well today was my first day of Creating Every Day Challenge and I found it very easy. I still have yet to "create" a newsletter tonight for the gem and mineral club I belong to and tomorrow will be to write up the tutorial I promised. Hopefully the rest of the month will be as easy to "Create" as these first few days of the month.
If you are taking the challenge, let me know by leaving me a comment and I'll add your blog to the blog list located in the right hand column.
Now go Create!
Since I have so many, maybe I'll list a few for sale or save them as Christmas gifts for family and friends.
Well today was my first day of Creating Every Day Challenge and I found it very easy. I still have yet to "create" a newsletter tonight for the gem and mineral club I belong to and tomorrow will be to write up the tutorial I promised. Hopefully the rest of the month will be as easy to "Create" as these first few days of the month.
If you are taking the challenge, let me know by leaving me a comment and I'll add your blog to the blog list located in the right hand column.
Now go Create!
Subscribe to:
Posts (Atom)